

What if your squat PR isn’t about doing more squats, but about moving better first?
This six-week progressive mobility program is the missing link for lifters who want deeper squats, cleaner overhead lockouts, and fewer aches.
Ten to 20 minutes per session, five to six days a week, it fits into your warmup or active recovery without stealing energy from your main lifts.
Follow the plan to build control at new end ranges so your mobility actually shows up in barbell work.
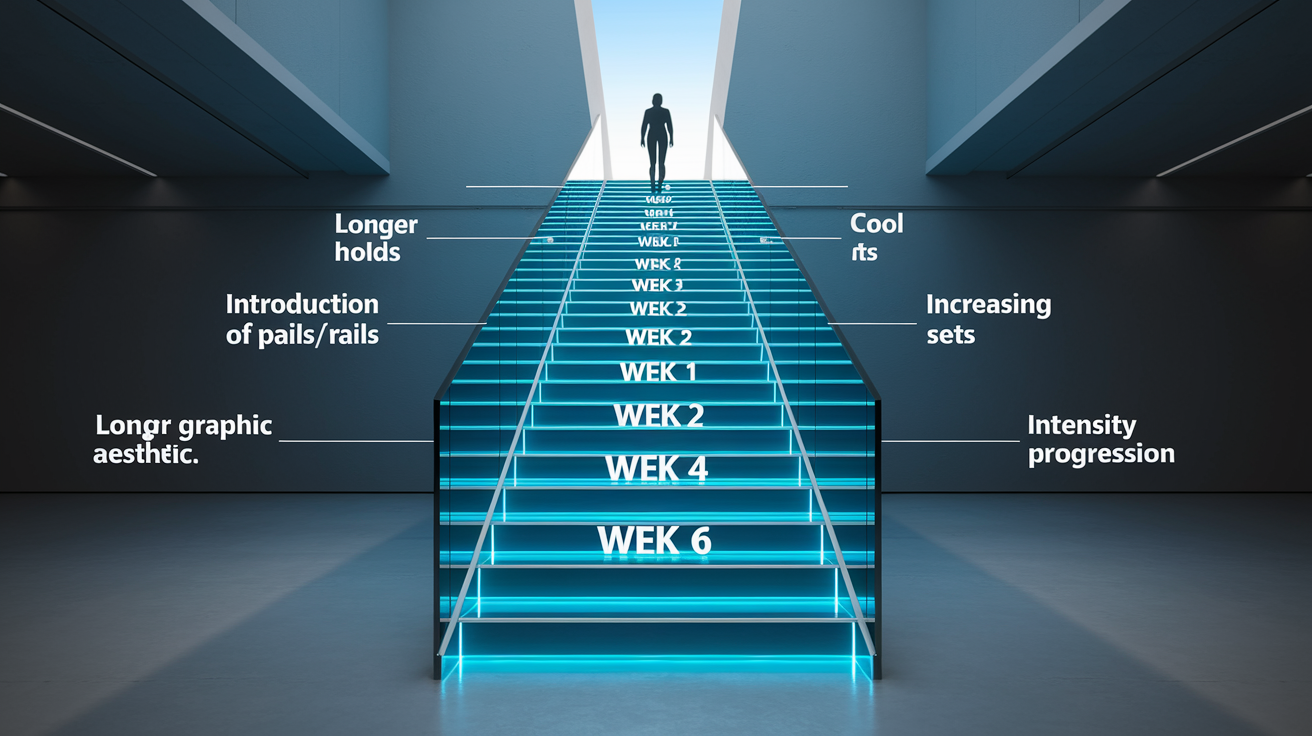
Complete Weekly Breakdown of the 6-Week Progressive Mobility Program for Lifters

This is your complete six-week mobility schedule in one spot. You’ll see how much time you’re committing each day, what each week focuses on, and how everything builds from basic positions into advanced end-range control that actually carries over to your lifts.
Each session takes 10 to 20 minutes. You’re doing mobility work five to six days per week, usually on lifting days as part of your warmup or right after training. On rest days, the mobility routine works as active recovery. It fits around your lifting without eating up tons of time or leaving you wiped out.
The progression follows a simple three-phase arc. Weeks 1 and 2 get you comfortable with baseline range of motion and teach you how to breathe and hold positions under tension. Weeks 3 and 4 expand that range and add active tension techniques (PAILs/RAILs) so you’re building strength at your new end ranges. Weeks 5 and 6 integrate everything into your barbell lifts and test your improved positions under actual load.
- Week 1: Establish baseline range of motion, learn breathing mechanics, get familiar with the core four-exercise daily routine.
- Week 2: Increase hold times to 60 seconds per position, clean up alignment cues, reduce early-phase soreness and stiffness.
- Week 3: Add PAILs/RAILs to two exercises, extend passive holds to 90 seconds, start to notice less discomfort entering stretches.
- Week 4: Apply PAILs/RAILs to all four exercises, use end-range isometrics for 10 to 15 seconds, measure improved squat depth or overhead position.
- Week 5: Integrate mobility gains into your lifting warmups, test heavier loads in improved positions, document changes in barbell movement quality.
- Week 6: Perform final assessments, capture progress photos, confirm measurable increases in hip flexion, shoulder flexion, ankle dorsiflexion, and thoracic rotation.
Mobility Program Foundations for Strength Athletes

Lifters who skip mobility work usually hit walls in squat depth, overhead lockout, or hip hinge mechanics long before their muscles max out. Joint-specific mobility training removes those positional roadblocks by teaching your nervous system to control and stabilize new ranges of motion. Dynamic warmups before each lifting session raise core temperature, get joints lubricated, and wake up the stabilizers that keep barbells moving in safe, efficient paths.
This program applies progressive overload principles to mobility, just like you would to a squat or deadlift. You’ll add time, tension, and complexity week by week. The result isn’t just passive flexibility. It’s active control. Strength at end range that transfers directly to barbell positions.
- Deeper squat positions: Improved hip and ankle mobility lets you hit depth without rounding your lower back or shifting weight forward onto your toes.
- Better overhead lockout: Shoulder and thoracic mobility clears space for the bar to stack directly over your midline, cutting down on compensations and shoulder strain.
- Reduced injury risk: Controlled end-range strength protects joints when you’re moving under fatigue or reaching for a new one-rep max.
- Faster warmup efficiency: Once your joints move freely, you need fewer ramp-up sets to feel ready for heavy work.
- Less chronic discomfort: Fixing mobility restrictions often reduces nagging pain in the lower back, hips, knees, and shoulders that pile up from years of lifting in limited ranges.
Assessments to Begin a 6-Week Mobility Progression
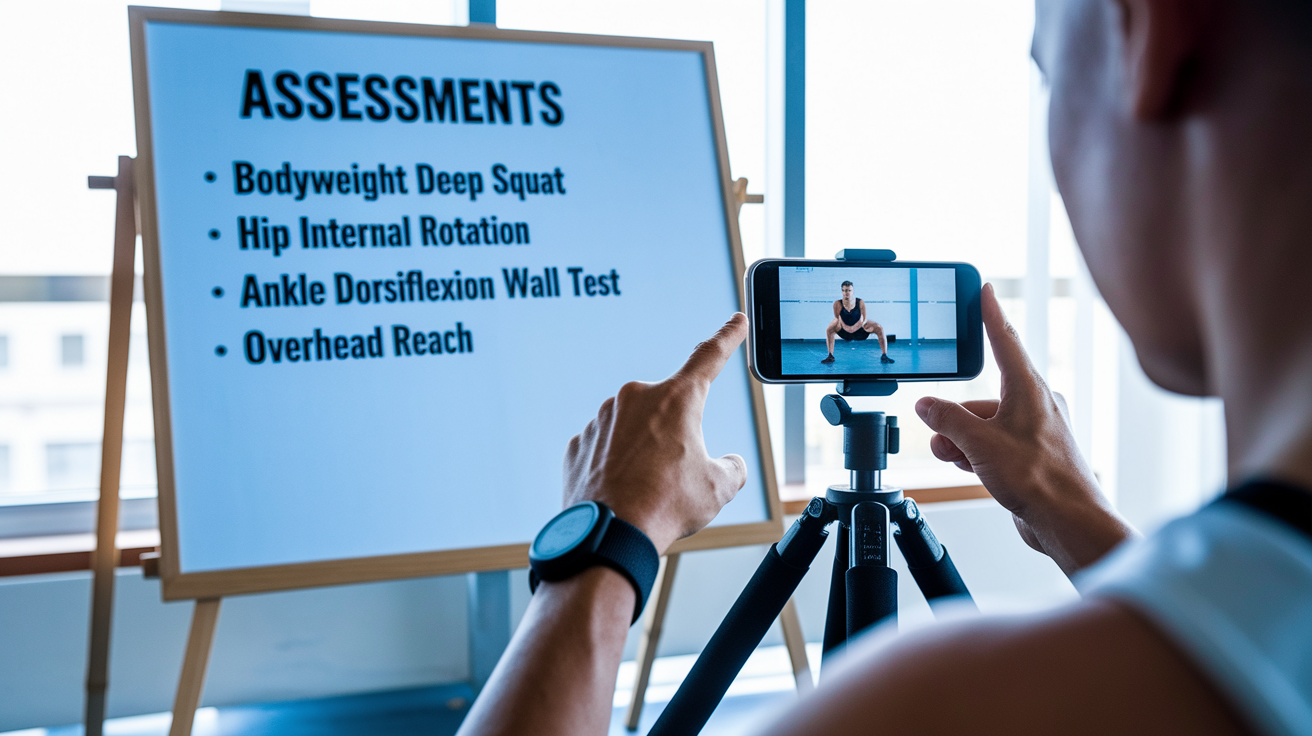
Starting with objective measurements gives you a clear baseline and takes the guesswork out of whether the program’s actually working. Subjective feelings like “I think my hips feel looser” don’t stack up against photos, videos, or measured angles. Assessments also help you personalize the program by spotting which joints need the most attention during your first few weeks.
Do each assessment at the beginning of Week 1 and again at the end of Week 6. Record your results with photos or video from the same angle and lighting each time. Compare the before-and-after images side by side to see real changes in range of motion and positioning.
| Assessment | What It Reveals | Ideal Week 1 Goal |
|---|---|---|
| Bodyweight Deep Squat Hold | Hip flexion, ankle dorsiflexion, thoracic extension, and balance in the bottom position | Hold for 30 seconds with heels down and spine neutral |
| Overhead Squat (PVC or Broomstick) | Shoulder flexion, thoracic extension, and ability to keep the bar stacked over your midfoot | Complete 5 reps to parallel without the bar drifting forward |
| Seated Hip Internal Rotation (90/90 Position) | Hip capsule mobility and control in internal and external rotation | Achieve 45 degrees of internal rotation on both hips |
| Wall Ankle Dorsiflexion Test | Ankle range of motion and calf/Achilles flexibility | Touch your knee to the wall with your toes 4 inches away |
Key Mobility Drills Lifters Will Train Throughout the 6 Weeks

This program features four daily exercises that rotate based on your weekly focus. You’ll see the same core movements week after week, with progressions in hold time, active tension, and positional difficulty. Each drill targets a specific joint or movement pattern that directly supports barbell performance.
Thoracic Expansion & Rotation Drills
Your thoracic spine (mid-back) needs both extension and rotation to keep your shoulders and hips moving freely. Stiff thoracic segments force your lower back and shoulders to compensate during squats, deadlifts, and overhead lifts. Drills in this category include open-book rotations, quadruped thread-the-needle, and supported thoracic extensions over a foam roller. You’ll feel these in your mid-back and between your shoulder blades, not in your lower back. Focus on breathing fully into your ribcage during each rep.
Hip-Control Mobility Drills
Hip mobility determines squat depth, deadlift setup, and your ability to hinge without rounding. The 90/90 position trains hip internal and external rotation at the same time. Sit on the floor with one leg in front (knee bent 90 degrees, shin parallel to your body) and the other leg to the side (knee bent 90 degrees, shin perpendicular). Hold each position for 60 to 90 seconds, then add PAILs/RAILs by pressing your knees into the floor for 10 seconds (that’s the active tension). The Olympic wall adductor stretch uses a strap or wall for support while you widen your stance and sink your hips toward the floor. You should feel a deep stretch in your inner thighs and groin, not your knees.
Shoulder + Scapular Mobility Drills
Overhead pressing and bench pressing both demand scapular upward rotation, shoulder flexion, and external rotation. Drills include wall slides with a band around your wrists to cue external rotation, shoulder-width PVC pass-throughs to expand range, and side-lying windmills to combine rotation with scapular control. Perform each movement slowly and pause at end range. You should feel these in the front and top of your shoulder, not deep inside the joint.
Ankle & Foot Mobility Drills
Ankle dorsiflexion (shin moving forward over your toes) is essential for upright squatting and Olympic lifting. Limited ankle range forces your knees to cave inward or your heels to lift off the floor. The wall ankle rocker drill has you place one foot a few inches from a wall, then rock your knee forward to touch the wall without your heel lifting. Gradually move your foot farther from the wall each week. Calf stretches with a straight knee target the gastrocnemius, and bent-knee versions target the soleus. Add lacrosse ball work on the plantar fascia (bottom of your foot) to release tension that travels up the posterior chain.
Principles Behind Week‑Over‑Week Mobility Progression (Without Weekly Breakdown)
Progressive overload for mobility works the same way it does for strength. You add a measurable stimulus each week to force adaptation. In mobility training, that stimulus can be longer hold times (from 30 seconds to 90 seconds), increased active tension during PAILs/RAILs, deeper ranges of motion, or additional sets. You’re not chasing soreness or fatigue. You’re chasing control and strength at positions your body doesn’t yet own.
Expected adaptations follow a predictable timeline. Weeks 1 and 2 often bring soreness and heightened awareness in the muscles and connective tissue around the joints you’re targeting. That discomfort fades by Week 3 as your nervous system learns to tolerate the new ranges. By Weeks 4 and 5, you’ll notice improved tolerance to stretch, better positional stability, and carryover into your barbell lifts. Deeper squats, smoother overhead lockouts, less lower-back compensation. Week 6 confirms measurable range-of-motion changes when you repeat your initial assessments.
- Progress hold times by 10 to 15 seconds per week: Start at 30 seconds in Week 1, reach 60 seconds by Week 2, extend to 90 seconds by Week 4.
- Add PAILs/RAILs once you can hold a position comfortably for 60 seconds: This usually happens in Week 3. Apply 10 seconds of maximal active tension at end range, rest, then repeat.
- Increase range of motion only when you can control your current range: If your hips shake or your lower back rounds during a stretch, stay at that depth and build strength before going deeper.
- Add sets or exercises when a single round feels too easy: Most lifters start with one set of each drill. By Week 5, you may add a second set to keep driving adaptation.
- Track soreness and joint reactivity as signals: Early soreness is normal. Persistent sharp pain or increased joint irritation means you’re progressing too fast and need to dial back intensity or range.
Warmup and Cooldown Mobility Protocols Integrated Into the 6-Week Plan

Every lifting session in this program starts with a two-round warmup circuit. Each round takes about three minutes and includes light mobility, activation, and positional drills that prep your joints and nervous system for loaded movement. You’ll perform the same warmup structure throughout all six weeks, adjusting intensity and range as your mobility improves.
After your lifting session, spend five to ten minutes on a cooldown that includes static stretching, light foam rolling, and diaphragmatic breathing. The cooldown helps your nervous system downregulate and reinforces the new ranges you worked on during your session. This phase is optional on heavy training days but highly recommended after lower-body sessions or any workout that aggravated a nagging area.
- Round 1 and 2 warmup movements: Cat-cow spinal waves (10 reps), deep bodyweight squat hold (20 seconds), scapular wall slides (8 reps), hip 90/90 position switches (5 per side), ankle rockers against a wall (8 per side), and dead bug with exhale emphasis (6 reps per side).
- Post-lift foam rolling targets: Spend 30 to 60 seconds per area on your thoracic spine, glutes, adductors, and calves. Avoid rolling directly over joints or your lower back.
- Static stretching selections: Choose two to three stretches that target the joints you trained that day. Couch stretch for hip flexors, doorway pec stretch for shoulders, strap hamstring stretch for posterior chain.
- Diaphragmatic breathing protocol: Lie on your back with knees bent, place one hand on your chest and one on your belly, and breathe so only your belly hand rises. Perform 10 slow breaths with a 4-second inhale and 6-second exhale to calm your nervous system.
How Mobility Progressions Improve Squat, Deadlift, Bench, and Overhead Lifts
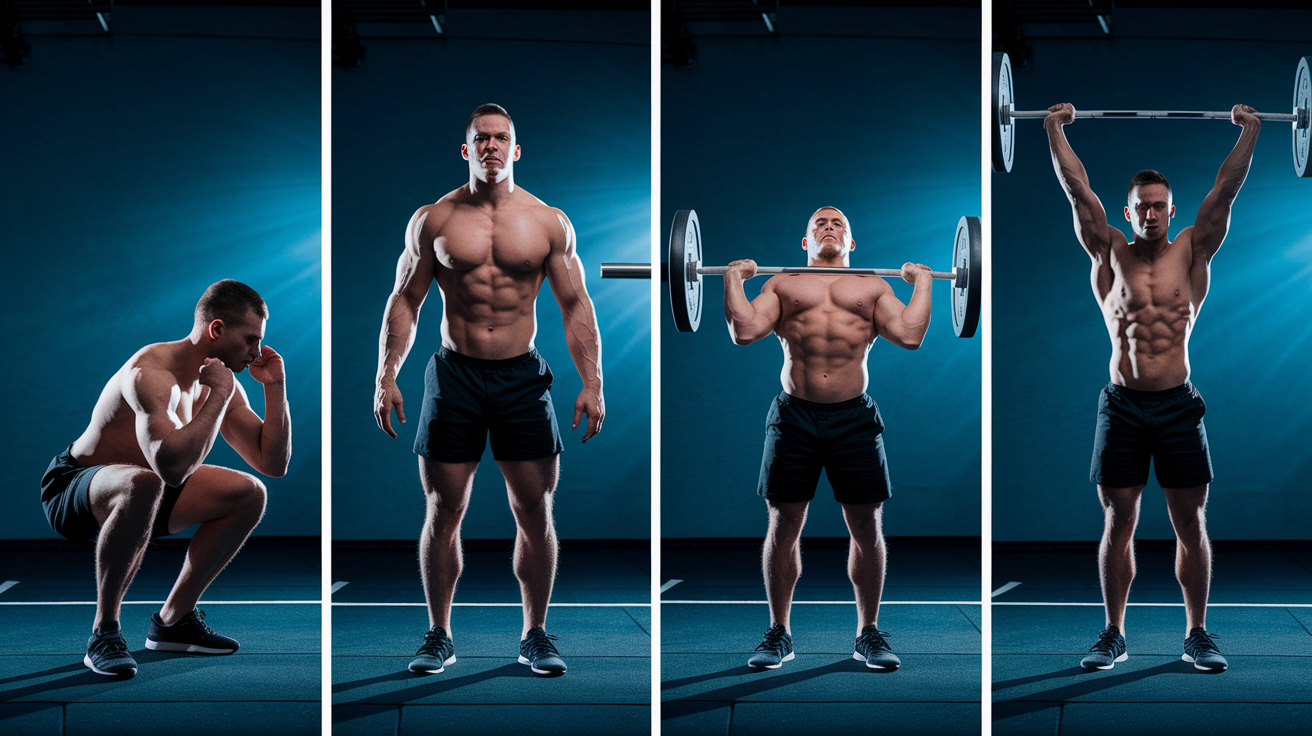
Mobility improvements translate directly into barbell performance by unlocking positions you couldn’t access before and giving you active control in those new ranges. A lifter who gains three inches of hip flexion and two inches of ankle dorsiflexion will squat deeper, shift less weight onto the toes, and reduce lower-back rounding at the bottom. A lifter who adds shoulder flexion and thoracic extension will lock out overhead presses with the bar stacked over the midline instead of drifting forward and grinding through the delts.
Positional stability improves when you own your end ranges. Owning a range means you can produce tension and control movement in that position, not just passively reach it. PAILs/RAILs work and end-range isometrics teach your nervous system to fire stabilizers at the edges of your motion, which makes those positions feel strong instead of unstable. That stability lets you brace harder, generate more force, and move heavier loads safely.
Bracing and breathing quality also improve when your ribcage and hips move freely. Restricted thoracic extension limits how much air you can pull into your lungs during a big brace. Tight hip flexors pull your pelvis into anterior tilt and make it harder to set your spine in a neutral, stable position before you pull a deadlift. Mobility work removes those restrictions and makes your bracing patterns more efficient.
- Squat: Hip flexion, ankle dorsiflexion, and thoracic extension allow deeper depth, better balance, and less compensatory lower-back rounding.
- Deadlift: Hip internal rotation, hamstring length, and thoracic mobility improve your setup position, reduce excessive spinal rounding, and help you maintain tension off the floor.
- Bench Press: Shoulder external rotation, scapular retraction, and thoracic extension create a stable arch and allow your shoulders to stay packed throughout the lift.
- Overhead Press: Shoulder flexion, thoracic extension, and scapular upward rotation let the bar travel in a vertical path directly over your midline, reducing shoulder impingement and increasing lockout strength.
Pain Management, Modifications, and Injury‑Prevention Strategies in a 6-Week Mobility Plan

Discomfort during mobility work is normal, especially in Weeks 1 and 2 when you’re introducing new ranges and active tension. You should feel a deep stretch, muscle burn during PAILs/RAILs, and temporary soreness in the areas you’re targeting. Sharp pain, joint clicking with pain, or symptoms that worsen during the session aren’t normal and require immediate modification.
If a drill causes sharp pain, reduce the range of motion by 20 to 30 percent and remove active tension. Stay in that modified range for the rest of the week, then reassess. If pain persists, skip that exercise and substitute a similar drill that targets the same joint from a different angle. For example, if the 90/90 hip position aggravates your knee, replace it with a supine hip internal rotation stretch using a strap.
- Knee-friendly modifications: Avoid deep end-range knee flexion if you have patellar pain. Substitute seated or standing stretches that keep your knee angle above 90 degrees.
- Lumbar stabilization cues: If a hip mobility drill increases lower-back discomfort, add a small towel under your lumbar spine for support and focus on maintaining a neutral pelvis throughout the stretch.
- Shoulder injury modifications: Skip overhead or end-range external rotation drills if you have rotator cuff issues. Replace them with scapular control drills like wall slides or prone Y-raises.
- Prehab vs rehab distinction: This program is prehab. It prevents injury by building capacity. If you’re currently rehabbing an acute injury, consult a physical therapist before starting.
- Rest day guidelines: If soreness from mobility work interferes with lifting performance, add one full rest day mid-week and reduce PAILs/RAILs intensity by 50 percent.
- Two-day rule: Don’t skip two consecutive days. Missing one session is fine, but two in a row disrupts habit formation and slows adaptation (a principle drawn from behavior-change research and confirmed in scraped case-study adherence notes).
Tracking Progress and Measuring Results Across the 6 Weeks

Objective measurements remove doubt about whether your mobility’s actually improving. Subjective feelings are useful day-to-day, but they’re unreliable for tracking long-term progress. Take before-and-after photos from the same angle, in the same lighting, wearing the same clothing. Measure range of motion in degrees if you have a goniometer, or use simple visual markers like “knee touches wall at 5 inches” for ankle mobility.
Do a weekly check-in every Sunday. Record your hold times, rate your discomfort level on a 1-to-10 scale for each drill, and note any changes in lifting performance (deeper squats, heavier deadlifts, less lower-back tightness). This weekly snapshot helps you identify which progressions are working and which drills need modification.
| Metric | How to Measure | Target for Week 6 |
|---|---|---|
| Hip Flexion (Bent Knee) | Lie on your back, pull one knee to your chest, measure the angle between your thigh and torso with a phone app or visual estimate | 120 degrees or greater (thigh touches your ribcage) |
| Ankle Dorsiflexion | Wall test: measure the distance from your toes to the wall when your knee touches without your heel lifting | 5 inches or greater |
| Shoulder Flexion | Stand with your back against a wall, raise both arms overhead, measure how close your wrists get to the wall without arching your lower back | Wrists touch the wall with ribs down and lower back flat |
| Squat Depth | Video yourself from the side performing a bodyweight squat; measure hip crease relative to knee height | Hip crease drops below the top of your kneecap (full depth) |
Final Words
You’ve got the full week-by-week and day-by-day layout, session targets (10–20 minutes), frequency guidance, starting assessments, and the core drills to use every day.
The plan shows how to build from a foundation (weeks 1–2), expand control (weeks 3–4), then integrate and test (weeks 5–6), plus simple pain-safe modifications and warm-up/cooldown templates.
Use the 6-week progressive mobility program for lifters as a clear, repeatable path — track small wins, tweak as needed, and expect steadier, stronger movement by week six.
FAQ
Q: What is the 3 3 3 rule for weight lifting?
A: The 3‑3‑3 rule for weight lifting is a strength template: three sets of three reps on a main lift, using heavy loads and tight technique. Increase weight once you hit all reps with clean form.
Q: Does Beachbody have a mobility program?
A: Beachbody includes mobility-focused routines inside Beachbody On Demand, offering short mobility and recovery sessions you can add to lifting days for joint prep and cooldown work.
Q: What is the 6 week powerlifting peaking program?
A: The 6‑week powerlifting peaking program is a focused block that reduces volume and raises intensity, with planned deloads, to polish technique and maximize one‑rep max performance for a meet or test day.
Q: How do you do a progressive overload program for lifting weights?
A: A progressive overload program for lifting weights means gradually increasing the challenge—more weight, reps, sets, or harder tempo—while keeping technique. Track progress and add small increments weekly, prioritizing recovery.