

You don’t need a barbell to build real muscle.
Bodyweight training, done with intent, adds size and strength you can measure.
Changing leverage, tempo, and unilateral loading gives progressive overload without plates.
You’ll track progress by adding reps, tougher variations, or longer holds.
This guide lays out the key moves, how they work, and simple ways to program them at home.
No flashy gear. No guessing.
Just a clear plan to build serious muscle with your body and time you already have.
Key Strength-Building Bodyweight Exercises and How They Work

Bodyweight training builds muscle and power by using your own mass and leverage as resistance. Every push-up, pull-up, or squat recruits muscle fibers and demands neural coordination. You’re not just building bigger muscles. You’re teaching your nervous system to fire those muscles efficiently under load.
The adaptations show up fast: more reps at a given difficulty, longer hold times, or nailing variations that were impossible a few weeks back. That’s measurable progress you can track.
Effective bodyweight work follows five core movement patterns. Pushing hits your chest, shoulders, and triceps. Pulling works your back and biceps. Squatting loads your quads and glutes. Hinging targets hamstrings and lower back. Core stability involves your abs, obliques, and deep stabilizers. A solid program cycles through all five patterns multiple times per week, building balanced strength that carries over to everyday tasks like lifting groceries, climbing stairs, or holding awkward positions without feeling wrecked.
Bodyweight exercises activate stabilizer muscles that machines miss. When you hold a plank, your shoulders, hips, and deep core work together to resist rotation and sagging. When you perform a single-leg squat, small muscles around your ankle and knee fire just to keep you balanced. This multi-joint demand is why getting stronger without weights translates so well to real-world situations.
Core bodyweight strength exercises:
Push-ups build pressing strength in your chest, shoulders, and triceps. They scale from wall push-ups all the way to one-arm variations.
Pull-ups and inverted rows develop pulling power in your back and biceps. Adjust leverage and you can keep progressing for years.
Squats and lunges strengthen your legs both bilaterally and unilaterally. Pistol squat variations unlock serious single-leg power once you’re ready.
Planks and hollow holds create anti-extension core stability and teach full-body tension under isometric load.
Dips and row variations balance upper-body pushing and pulling to prevent imbalances and support joint health.
Structuring Bodyweight Workouts for Maximum Results

Strength adaptations require structure. Sets, reps, rest periods, tempo, and training frequency all influence whether your program builds maximal strength, hypertrophy, or endurance.
For pure strength, work in low-rep ranges where each repetition is difficult and demands near-maximal effort. That might mean 3 to 6 reps of a challenging variation like archer push-ups or assisted one-arm pull-ups, with rest periods long enough to allow full recovery between sets. For muscle size and strength-endurance, 6 to 15 reps per set with shorter rest works well.
Either way, the principle stays the same: controlled progression over weeks, not random daily effort.
Progressive overload without weights comes from manipulating leverage, tempo, and unilateral demand. Instead of adding a plate to a barbell, you shift your body position to increase resistance. An incline push-up becomes a standard push-up, then a decline push-up, then an archer push-up.
You can also slow the eccentric (lowering) phase to 3 to 6 seconds, which dramatically increases time under tension. Pausing at the bottom of a squat for 2 seconds, or holding the top of a pull-up for 3 seconds, builds strength at specific joint angles. Unilateral work doubles the load on a single limb and exposes weak points that bilateral moves can hide.
Five variables to program for bodyweight strength:
Sets and reps for strength: 3 to 6 reps of hard variations, 3 to 6 sets. Or 6 to 15 reps for hypertrophy focus.
Rest intervals: 2 to 5 minutes between strength sets. 60 to 90 seconds for hypertrophy or endurance work.
Tempo and eccentric focus: 1 to 5 second eccentric on strength sets. 2 to 3 seconds for hypertrophy. Explosive concentric when safe.
Weekly training frequency: 2 to 4 sessions per week per muscle group, spread across the week with 48 to 72 hours recovery.
Progression targets per week: add 1 to 2 reps, increase hold time by 5 seconds, or move to the next leverage variation every 1 to 2 weeks.
| Variable | Prescription |
|---|---|
| Intensity | 3–6 reps (max strength) or 6–15 reps (hypertrophy); leverage adjusted to hit target range |
| Rest | 2–5 minutes (strength); 60–90 seconds (hypertrophy/endurance) |
| Frequency | 2–4 sessions/week per muscle group; 48–72 hours between heavy sessions |
Push Strength Development Using Bodyweight Movements

Push exercises target your chest, shoulders, and triceps. They scale beautifully from absolute beginner to advanced athlete. The push-up family offers enough variations to keep you progressing for years.
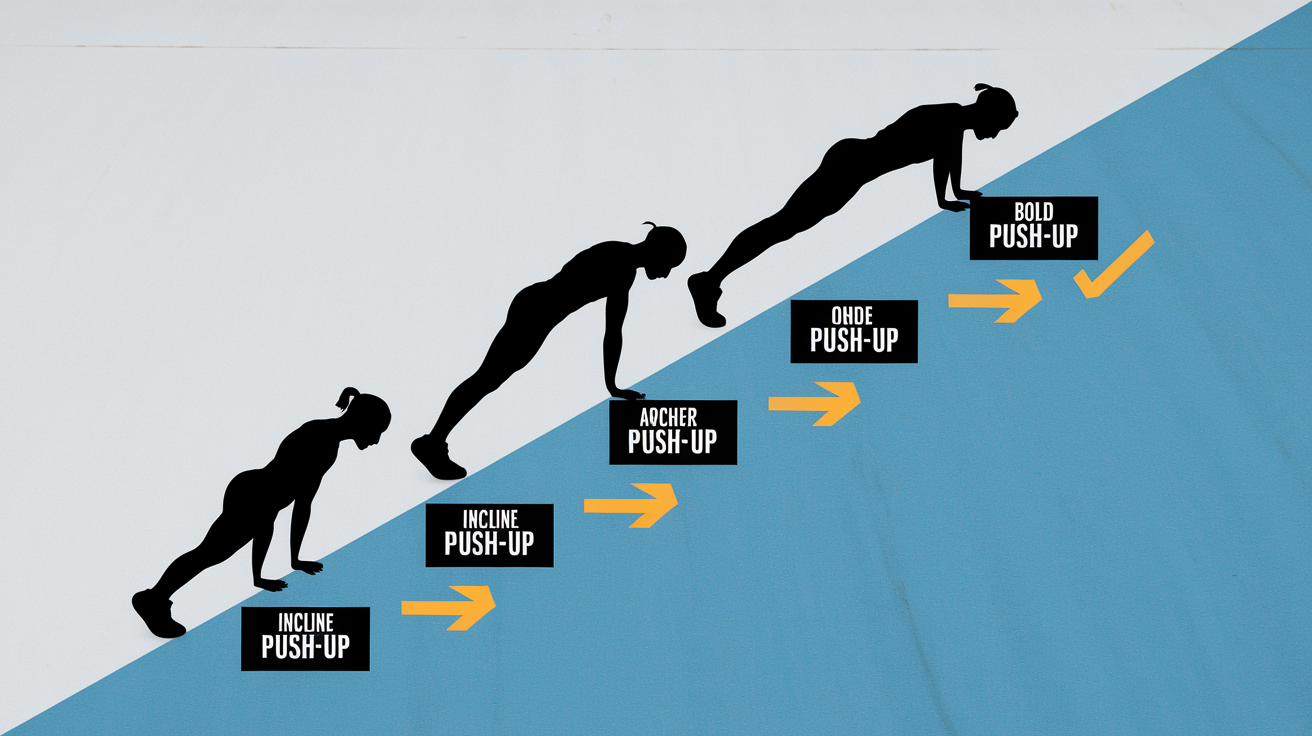
Wall push-ups work for someone recovering from injury or starting from zero upper-body strength. Elevated push-ups (hands on a bench or countertop) reduce the load while teaching correct form. Standard push-ups on the floor are the baseline most people recognize. Decline push-ups (feet elevated) increase the load on your shoulders and upper chest. Archer push-ups shift most of your weight onto one arm while the other assists. One-arm push-ups are the peak of horizontal pushing strength and require serious core stability and unilateral power.
Form matters more than rep count. Keep your elbows roughly 30 to 45 degrees from your torso, not flared wide. Lower until your chest nearly touches the floor or your hands, pause for a fraction of a second, then press up with control.
Your body should stay rigid from head to heels, core tight, no hip sag or piking at the waist. Scapular control is key. As you lower, your shoulder blades should glide together slightly. As you press, they protract around your ribcage. Full-depth reps build more strength than half reps, and slower tempo reps (2 to 3 seconds down, 1 second up) increase difficulty without changing the exercise.
Push-Up Progressions for Strength
Start with the easiest variation you can perform for 8 to 12 controlled reps. Once you hit 12 reps comfortably for 3 sets, move to the next harder version.
Wall push-ups progress to elevated push-ups (hands on a sturdy chair or countertop), then to knee push-ups if you need an intermediate step before full push-ups on your toes. From standard push-ups, elevate your feet on a low box or bench to shift more weight forward.
Archer push-ups come next. In the top position, extend one arm out to the side and lower your chest toward the hand that stays under your shoulder, then press back up and alternate sides.
One-arm push-ups demand that you keep one hand behind your back or out to the side, feet wide for stability, and press the full load with a single arm. Each jump in difficulty should feel challenging but achievable within a few weeks of focused practice.
Building Pulling Strength Without Weights

Pulling strength without weights is harder to program than pushing because you need something to pull against. Pull-ups and chin-ups are the gold standard, but they require a bar. Inverted rows (also called Australian rows) use a low bar, sturdy table edge, or suspension trainer and let you adjust difficulty by changing your body angle.
Doorframe rows are a low-equipment option. Stand in a doorway, grip the frame on both sides at chest height, lean back with your feet forward, and pull your chest toward your hands. Just protect your fingers from pinching by wrapping a towel around the frame or using the inside edge carefully.
Pull-ups build serious back and bicep strength, but most beginners can’t do one rep yet. Assisted pull-ups using a resistance band looped over the bar, or a partner holding your feet, reduce the load enough to complete reps with good form.
Eccentric negatives are even more effective. Jump or step up to the top position of a pull-up (chin over bar), then lower yourself as slowly as possible, aiming for 3 to 6 seconds. This eccentric-only work builds the strength needed for a full pull-up faster than anything else. Chin-ups (palms facing you) are slightly easier than pull-ups (palms away) because they recruit more bicep, so start there if needed.
Rows are the horizontal pull counterpart to vertical pull-ups. Inverted rows let you scale difficulty by raising or lowering the bar height. A higher bar (more upright body) is easier. A lower bar (more horizontal) is harder. For maximum difficulty, elevate your feet on a box so your body is completely horizontal.
Keep your body rigid, initiate the pull by retracting your shoulder blades, then drive your elbows back and pull your chest to the bar. Avoid kipping or using momentum. Each rep should be controlled, with a 1-second pause at the top.
Four progression methods for pulling strength:
Assisted pull-ups or chin-ups: use bands, partner assist, or a pull-up machine to reduce load until you build enough strength for bodyweight reps.
Eccentric negatives: jump to the top, lower for 3 to 6 seconds. Builds strength faster than partial reps.
Inverted or Australian rows: adjust bar height or foot elevation to control difficulty. Progress toward horizontal body position.
Increased leverage: move from tucked body positions (knees bent, compact) to extended positions (legs straight, body long) to increase resistance.
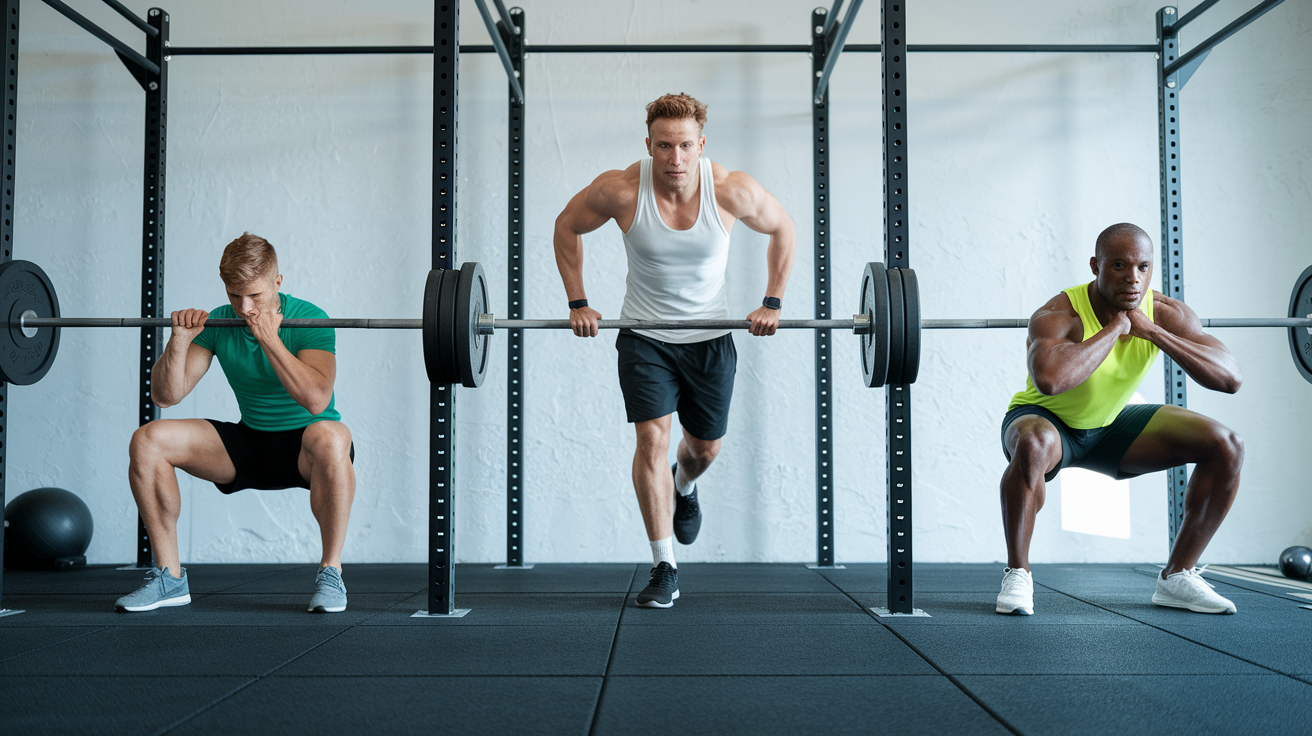
Lower-Body Strength Using Bodyweight-Only Leg Training

Bodyweight leg training builds serious strength if you progress beyond basic squats and lunges. Bilateral squats (both feet on the ground) are a starting point. Stand with feet shoulder-width apart, toes slightly out, and lower until your thighs are at least parallel to the floor. Keep your chest up, knees tracking over your toes, and weight on your midfoot.
Beginners often start with 20 bodyweight squats in a circuit, focusing on controlled tempo and full depth. Once you can complete 3 sets of 20 reps easily, it’s time to increase difficulty.
Single-leg variations unlock new strength potential. Walking lunges, reverse lunges, and Bulgarian split squats (rear foot elevated on a bench) all load one leg at a time and expose imbalances.
Pistol squats are the king of single-leg bodyweight strength. Stand on one leg, extend the other leg forward, and squat all the way down while keeping the non-working leg off the ground, then stand back up. Most people can’t do a full pistol squat on day one. Regressions include box-supported pistols (lower onto a box or bench, then stand), partial pistols (squat halfway down), and assisted pistols (hold a doorframe or suspension trainer for balance).
Nordic hamstring curls are a brutal posterior-chain builder that requires only a pad for your knees and something to anchor your feet (a partner, a heavy couch, or a barbell in a rack). Kneel on the pad, anchor your feet, keep your body straight from knees to head, and lower forward as slowly as possible, resisting with your hamstrings.
Most people can only control the first few inches before collapsing, and that’s fine. Even eccentric-only reps build hamstring strength and size. For glutes and hip extension, single-leg glute bridges and single-leg Romanian deadlifts (balance on one leg, hinge at the hip, reach toward the floor) round out a complete lower-body program.
Pistol Squat Progression Path
Start with box-supported pistol squats. Stand on one leg in front of a sturdy box or bench set at knee height. Extend the non-working leg forward, squat down until you sit lightly on the box, pause for a moment, then drive through your heel and stand back up.
Once you can complete 8 to 10 reps per side, lower the box height or move to partial pistols: squat as low as you can with control, then return to standing without sitting.
Counterbalance pistols use a light weight (a water bottle or small dumbbell) held at arm’s length in front of your chest to shift your center of mass and make balance easier.
Finally, attempt full pistols with no assistance. Keep your chest up, non-working leg extended forward parallel to the ground, and descend all the way until your hamstring touches your calf. Ankle and hip mobility are limiting factors for many people, so include ankle stretches and hip flexor work in your warm-up.
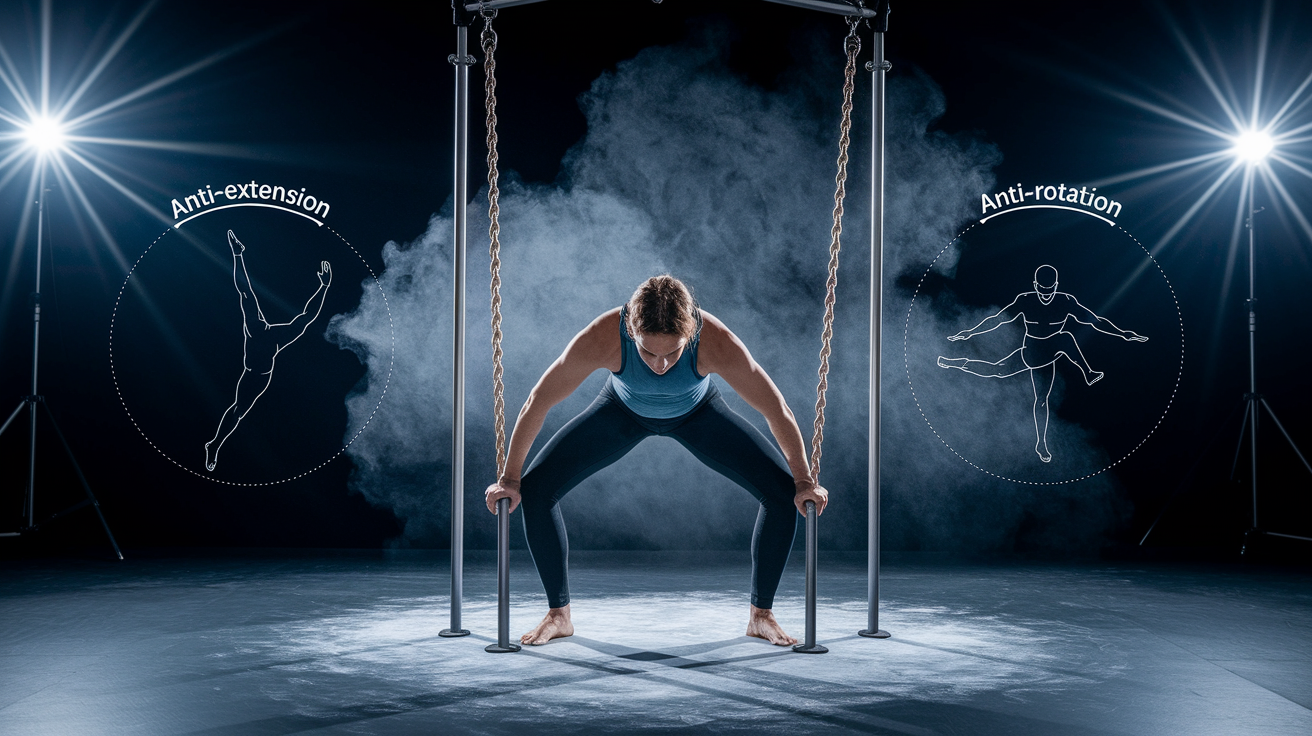
Core Strength Development Through Bodyweight Training
Core strength is more than visible abs. It’s your ability to resist unwanted movement (anti-extension, anti-rotation, anti-lateral flexion) and transfer force between your upper and lower body.
Planks teach anti-extension. You hold a rigid position and prevent your hips from sagging toward the floor. Start in a forearm plank with your elbows under your shoulders, body straight from head to heels, and ribcage pulled down toward your pelvis (slight posterior pelvic tilt). Hold for 15 to 60 seconds, rest, repeat. Avoid looking up, which strains your neck. Keep your gaze at the floor a few inches in front of your hands.
Side planks add anti-lateral-flexion work. Lie on your side, prop yourself up on one forearm, stack your feet, and lift your hips until your body forms a straight line. Hold for 20 to 45 seconds per side.
For anti-rotation, bird-dogs and Pallof press variations (if you have a band) teach you to resist twisting forces. Hollow holds are a step up from planks. Lie on your back, lift your shoulder blades and legs a few inches off the floor, arms extended overhead or by your sides, and hold a shallow “dish” shape. This position is harder than it looks and builds serious anterior core strength. Aim for 20 to 60 seconds.
Advanced progressions include L-sits and dragon flags. An L-sit requires you to sit on the floor (or between parallettes or chairs), press your hands down, lift your entire body off the ground, and hold your legs straight out in front at 90 degrees. Start with bent-knee tuck L-sits and gradually extend your legs as strength improves.
Dragon flags involve lying on a bench, gripping the bench behind your head, lifting your entire body (shoulders to feet) off the bench, and lowering with control while keeping your body straight. These are elite-level moves that take months or years to master, but they represent the upper end of bodyweight core strength.
| Exercise | Hold/Rep Target | Difficulty Level |
|---|---|---|
| Plank | 15–60 seconds | Beginner |
| Side plank | 20–45 seconds per side | Beginner to Intermediate |
| Hollow hold | 20–60 seconds | Intermediate |
| L-sit | 10–30 seconds | Advanced |
Full-Body Bodyweight Strength Sessions (Beginner to Advanced)

A well-designed full-body calisthenics session hits all major movement patterns in one workout, letting you train 3 to 4 times per week with a day of rest between sessions. Beginner circuits focus on moderate reps, manageable difficulty, and building the habit of consistent training. Intermediate routines increase sets and dial in intensity to specific rep ranges. Advanced sessions use low reps of very hard variations, long rest periods, and skill-based progressions like front lever work or muscle-up practice.
Beginner full-body routine example:
Perform 3 circuits of the following with 60 to 90 seconds rest between circuits. Each circuit includes 20 bodyweight squats, 10 push-ups (modify to knee or elevated if needed), 10 inverted rows (or doorframe rows), 15-second plank, and 30 jumping jacks. Complete all exercises back-to-back if possible, rest 60 seconds, repeat the circuit twice more. Total workout time is roughly 20 minutes. Track your reps and aim to add 1 to 2 reps per exercise each week, or move to a harder variation once you hit the top of the rep range for 3 consecutive sessions.
Intermediate strength circuit example:
4 sets of 8 to 12 push-ups (standard or decline), 4 sets of 6 to 10 pull-ups or chin-ups (assisted if needed), 3 sets of 10 to 15 walking lunges per leg, 3 sets of 30 to 45 second planks, rest 90 to 180 seconds between sets of the same exercise. This session takes 35 to 45 minutes and emphasizes controlled tempo and near-failure intensity. Once you can complete all sets at the top of the rep range, progress to a harder variation or add a slow eccentric (3 seconds down).
Advanced strength-skill session example:
5 sets of 3 to 6 archer push-ups or one-arm push-up progressions, 5 sets of 3 to 6 pistol squats per leg, 5 sets of 5 to 12 second front lever tuck holds, 5 sets of 3 to 6 muscle-up attempts or progressions (explosive pull-up to transition practice). Rest 2 to 4 minutes between sets to allow full recovery. This session prioritizes maximal strength and skill acquisition, not conditioning. Expect 45 to 60 minutes including warm-up.
Three sample workout structures:
Beginner full-body routine: 3 circuits: 20 squats, 10 push-ups, 10 rows, 15-second plank, 30 jumping jacks. 60 to 90 seconds rest between circuits.
Intermediate strength circuit: 4 sets: 8 to 12 push-ups, 6 to 10 pull-ups, 10 to 15 lunges per leg, 30 to 45 second plank. 90 to 180 seconds rest between sets.
Advanced strength-skill session: 5 sets: 3 to 6 archer push-ups, 3 to 6 pistol squats per leg, 5 to 12 second front lever holds, 3 to 6 muscle-up progressions. 2 to 4 minutes rest.
Progressive Overload for Bodyweight Strength Gains
Progressive overload is the non-negotiable principle behind strength gains. Your body adapts to the stress you place on it, so you must gradually increase that stress over time. Without weights, you manipulate leverage, tempo, volume, and unilateral demand to keep the challenge rising.
The simplest method is to add reps. If you did 8 push-ups last week, aim for 9 or 10 this week. Once you can complete your target sets and reps comfortably for two consecutive sessions, it’s time to progress.
Leverage progressions are the backbone of a progressive calisthenics plan. An incline push-up becomes a standard push-up by lowering your hands from a bench to the floor. A standard push-up becomes a decline push-up by elevating your feet. A decline push-up becomes an archer push-up by shifting weight onto one arm. Each step increases the percentage of your bodyweight you’re pressing, sometimes by 10 to 20 percent or more. The same principle applies to squats (two legs to one leg), pull-ups (assisted to bodyweight to weighted-style one-arm progressions), and planks (standard to side to extended-arm or single-leg variations).
Tempo and isometric work add difficulty without changing the exercise. Slow your eccentric phase to 3 to 6 seconds on every rep. This increases time under tension and recruits more muscle fibers, especially at the weakest point of the range of motion.
Add a 2 to 3 second pause at the bottom of a squat, the bottom of a push-up, or the top of a pull-up. These pauses eliminate momentum and force your muscles to produce tension from a dead stop. Isometric holds for strength (not just endurance) should last 5 to 30 seconds at near-maximal difficulty. For example, hold the bottom position of a pistol squat for 10 seconds, or hold a tuck front lever for 15 seconds. Rest 2 to 4 minutes between isometric sets to allow full recovery.
Three core methods to apply progressive overload without weights:
Increase difficulty through leverage: progress from easier body positions (incline, assisted) to harder positions (decline, unilateral, extended).
Add eccentric tempo and pauses: slow the lowering phase to 3 to 6 seconds and insert 2 to 3 second pauses at weak points.
Use unilateral variations: shift from two-limb to single-limb exercises to double the relative load and expose imbalances.
Warm-Up, Mobility, and Injury Prevention for Bodyweight Athletes
A proper warm-up prepares your joints, activates stabilizers, and reduces injury risk. Start with 2 to 5 minutes of light cardio to raise your core temperature: jog in place, jump rope, or do jumping jacks.
Follow with 5 to 12 minutes of dynamic mobility work targeting the joints and movement patterns you’ll use in the session. Scapular shrugs and wall slides wake up your shoulder stabilizers before pushing or pulling. Leg swings (front-to-back and side-to-side) open up your hips before squats or lunges. Arm circles, wrist circles, and ankle circles prepare smaller joints for load.
Movement-specific warm-up sets are just as important as general mobility. Before your working sets of push-ups, do 1 to 2 sets of an easier variation (wall or elevated push-ups) at 50 to 60 percent effort. Before pull-ups, hang from the bar and perform slow scapular pulls (pull your shoulder blades down and together without bending your elbows) for 5 to 10 reps. Before pistol squats, do a set of assisted pistols or goblet squats with light load. These ramp sets teach your nervous system the movement pattern and allow you to check your form before intensity rises.
Common errors that lead to injury include letting your hips sag in planks (puts pressure on your lower back), allowing your knees to cave inward during squats or lunges (stresses the knee joint), and flaring your elbows wide during push-ups (strains the shoulder).
If you have knee sensitivity, choose low-impact variations like good mornings (a hip hinge with bodyweight) instead of jump squats, and walking jacks instead of jumping jacks. If your wrists hurt during push-ups, try using push-up handles or performing push-ups on your fists. Stop any exercise that causes sharp joint pain, and scale back to an easier variation or substitute a similar movement that doesn’t hurt.
Five essential warm-up and activation moves:
Scapular shrugs and wall slides: activates shoulder stabilizers and prepares for pushing and pulling.
Leg swings (front-back, side-side): opens hip range of motion before squats and lunges.
Arm circles and wrist circles: prepares shoulder and wrist joints for load.
Ramp sets of easier variations: 1 to 2 sets at 50 to 60 percent effort before working sets.
Ankle mobility drills: calf stretches and ankle circles support squat depth and single-leg stability.
Tracking Progress and Long-Term Strength Planning
You can’t improve what you don’t measure. Keep a simple training log that records the date, exercise, sets, reps (or hold time), and any notes about form or difficulty.
Each week, review your log and look for small wins: an extra rep on push-ups, 5 more seconds on a plank, or the ability to perform an exercise that was impossible last month. These incremental improvements are proof that your program is working. If progress stalls for two consecutive weeks, it’s time to adjust intensity, volume, or exercise selection.
Benchmark testing gives you clear strength goals to chase. Common bodyweight benchmarks include 10 strict push-ups, 5 strict pull-ups, a 60-second plank, and 10 pistol squats per leg. Test these every 4 to 6 weeks, not every session. Frequent testing is fatiguing and doesn’t allow enough time for adaptation.
When you hit a benchmark, celebrate it, then set a new one: 15 push-ups, 8 pull-ups, a 90-second plank, or 15 pistol squats per leg. Long-term goals might include a one-arm push-up, a 20-second L-sit, or a freestanding handstand push-up.
Periodization structures your training into phases with different focuses. A simple 8 to 12 week block might look like this:
Weeks 1 to 4 focus on building volume and technique (3 to 4 sessions per week, 3 to 4 sets per exercise, moderate reps, controlled tempo).
Weeks 5 to 8 shift toward strength (reduce reps, increase difficulty via leverage or unilateral work, 3 to 5 sets, longer rest).
Weeks 9 to 12 peak strength and introduce maximal-difficulty progressions (one-arm variations, pistol squats, front lever holds, 3 to 6 rep ranges or 5 to 20 second holds).
Week 12 or 13 is a deload: reduce volume by 30 to 50 percent or take 3 to 7 days of light movement. After the deload, start a new block with slightly harder baseline exercises and continue the cycle.
Three pillars of long-term progress tracking:
Log sets, reps, and hold times: record every session so you can spot trends and plan progressions.
Benchmark testing ideas: test push-ups, pull-ups, plank holds, pistol squats every 4 to 6 weeks. Set new targets after each test.
Periodization overview: plan 8 to 12 week blocks with volume, strength, and peak phases. Include a deload week every 4 to 8 weeks to prevent burnout.
Final Words
In the action, we mapped the core moves: push, pull, squat, hinge, and core, and showed how to build strength without weights using progressions, tempo, and single-leg work. You got workout structures, rep ranges, and warm-up basics.
Pick one beginner or intermediate session and track reps, holds, and rest. Progress slowly, tweak leverage, add eccentrics, or extend holds.
Stick with the plan, test benchmarks every few weeks, and deload when needed. Small, steady wins. Bodyweight workouts for strength work when you show up.
FAQ
Q: Can you build strength with bodyweight?
You can build strength with bodyweight by using progressive overload—harder variations, slower eccentrics, unilateral moves, and tracked reps/holds—effective for beginners through advanced trainees.
Q: What is the 3-3-3 rule for workout?
The 3-3-3 rule commonly means three sets of three reps (3×3) for strength—low-rep, high-intensity work with longer rests to improve maximal strength and neural efficiency.
Q: What is the 5 5 5 30 rule?
The 5‑5‑5‑30 rule usually describes five sets of five reps with roughly 30 seconds rest, a template for strength-endurance or metabolic work when loads are light or bodyweight is used.
Q: What exercise is best for high blood pressure?
The best exercise for high blood pressure is regular aerobic activity—brisk walking, cycling, or swimming—about 150 minutes weekly, plus two strength sessions, with medical clearance if needed.