

Think bending from your waist is normal?
It’s not. That habit loads your low back and invites pain.
The hip hinge fixes that by making your hips and hamstrings do the work while your spine stays neutral.
You should master it before adding weight.
This guide gives step-by-step drills, simple breathing and bracing cues, and quick checks you can use today to build a safe, automatic hinge from scratch.
No nonsense, no guessing, just practical steps that protect your discs and get your posterior chain working.
Mastering the Basic Hip Hinge Pattern for Beginners

A hip hinge is when you bend forward by pushing your hips back while your spine stays neutral from your low back all the way to your head. Your hips and hamstrings do the work. Your spine doesn’t round or flatten.
This is totally different from bending over at your waist with a curved back, which loads your discs unevenly and cranks up injury risk over time.
You’ve got to master this before adding weight. Repeated flexion at the lumbar spine concentrates pressure on the edges of intervertebral discs. Good hip hinge technique protects those discs by keeping your spine still and letting your hips move.
Setup: feet about hip width, toes straight ahead. Brace your abs like you’re about to take a light punch (firm, not stiff). Lock that brace before you move.
Here’s how to do it:
- Stand tall, chest up, weight balanced through your heels and midfoot.
- Take a breath, hold it briefly, tighten your abs to lock your ribcage to your pelvis.
- Push your hips straight back. Knees stay soft (small bend, not locked).
- Let your torso tip forward naturally as your hips travel backward. Spine stays neutral.
- Stop when you feel a stretch in your hamstrings or when you can’t keep your spine still.
- Drive your hips forward by squeezing your glutes hard until you’re standing upright again.
At the end range you should feel your hamstrings lengthen. Your spine shouldn’t change shape. If you can’t feel where your lumbar spine is, use a dowel drill. Hold a stick along your back touching your head, upper back, and tailbone, and keep all three points in contact throughout the movement.
The wall hinge is another good check. Stand about 6 to 12 inches from a wall and push your hips back until they tap it, then return.
Understanding Hip Hinge Mechanics and Posterior Chain Activation

The hip hinge loads the posterior chain. That’s the collection of muscles along the back of your body.
Hip dominant movement shifts tension away from passive structures in your low back (discs and ligaments) and onto muscles designed to produce force. When you hinge correctly, your hamstrings, glutes, and spinal erectors work together to control the movement and protect your spine under load or during everyday tasks like picking up a box.
Here’s what each muscle group does:
Hamstrings lengthen as your hips push back and shorten as you return. They control the descent and help drive you upright.
Glutes fire hard at the top to bring your hips forward and finish the movement in a stable, neutral position.
Spinal erectors (the muscles running along your spine) maintain the neutral curve in your low back so your spine moves as one solid piece.
Core stabilizers (abs and obliques) brace your torso to prevent flexion, extension, or rotation during the hinge.
Lats and upper back create tension by keeping your shoulders pulled down and back, which anchors the top of the movement.
Neutral pelvis is the starting point for all of this. If your pelvis tilts too far forward (overarched low back) or too far backward (flat low back), your spine can’t stay neutral.
The “pouring pelvis” palpation drill helps you find that position. Stand about 8 inches from a wall, place your thumb on the bony point at the back of your hip (PSIS) and your index finger on the bony point at the front (ASIS), then tilt your pelvis forward like you’re pouring water out of a bowl. Feel those landmarks move. Now tilt backward.
Neutral is the middle position.
Cat/Cow is another drill. Get on your hands and knees and round your spine like a scared cat, then arch it like a cow. Do 5 reps to feel the extremes, then settle into the middle. That middle position is what you maintain during the hinge.
Step-by-Step Beginner Hip Hinge Drills and Regressions
Beginner drills build the hinge pattern without adding confusion or load. Start with one or two drills and use them for a week or two until the movement feels automatic.
These three regressions catch the most common problems before they become habits.
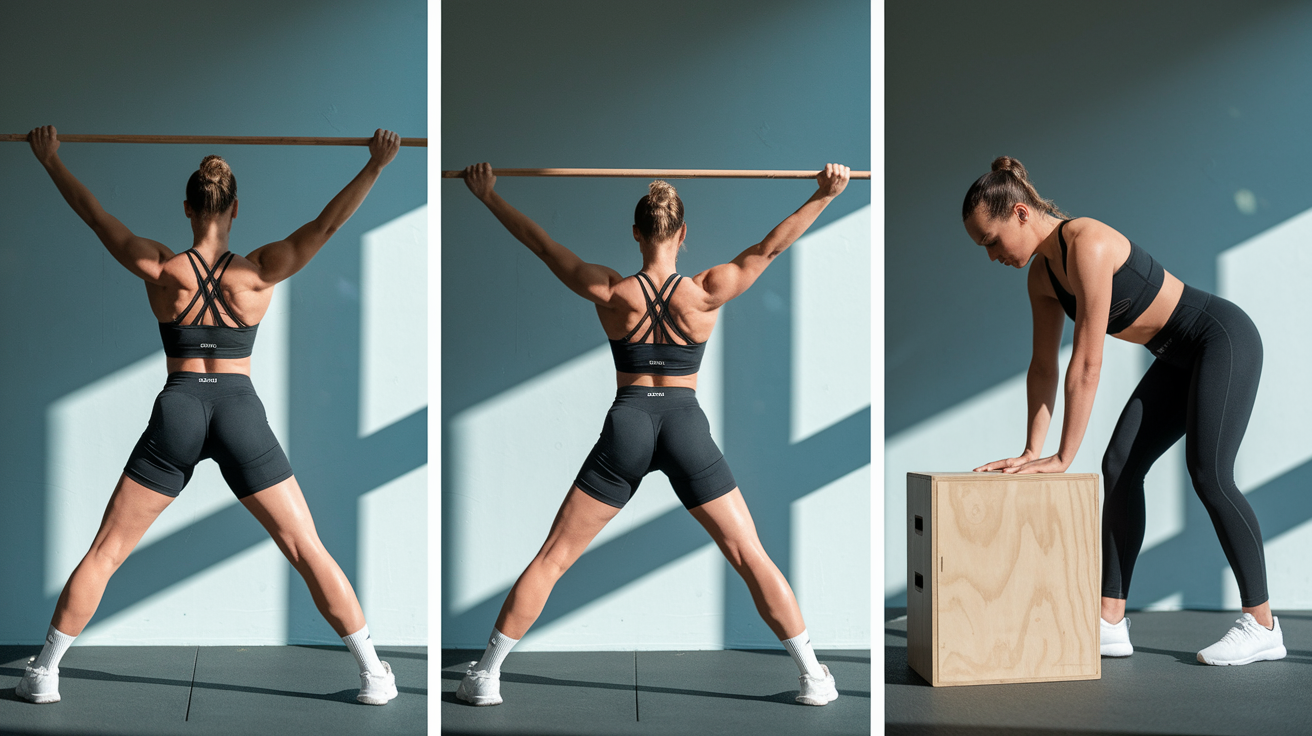
Dowel/PVC Hinge Drill
Hold a stick that’s at least 4 feet (120 centimeters) long. Place one hand behind your neck and the back of your other hand on your low back. The stick should touch three points: the back of your head, your upper back between your shoulder blades, and your tailbone.
Stand with feet hip width. Push your hips back and hinge forward while keeping all three contact points on the stick. If the stick loses contact with your head or tailbone, your spine is rounding or overarching.
Reset and shorten your range.
Perform 2 to 4 sets of 6 to 10 reps. Stop each rep before you lose contact. This drill gives instant feedback and trains your body to move as one unit.
Wall Hinge Drill
Stand 6 to 12 inches away from a wall, facing away from it. Push your hips straight back until your glutes lightly touch the wall, then drive your hips forward to return upright.
Your torso will tip forward naturally, but your spine stays neutral. Keep your weight on your heels and midfoot. Your knees stay soft and your shins stay relatively vertical.
Perform 2 to 3 sets of 8 to 12 reps.
This drill teaches you to push your hips backward instead of squatting down or folding at the waist. If you can’t reach the wall without rounding your back, move closer or reduce your range.
Box/Bench Tap Drill
Find a sturdy box or bench 16 to 20 inches high (40 to 50 centimeters). Stand a few inches in front of it. Hinge back until your glutes tap the surface lightly, then return. Don’t sit down. The tap is a touch and go cue.
Keep your shins vertical and your weight through your heels. Perform 3 sets of 6 to 10 reps. As you improve, lower the box height or move farther away to increase the challenge.
This drill reinforces the hip back cue and prevents knee dominant movement.
These regressions fix the two biggest beginner issues: rounding the back and turning the hinge into a squat. If you practice one drill per session for two weeks, your hinge pattern will become consistent enough to add light load.
Improving Breathing, Bracing, and Spinal Stability During the Hip Hinge

Proper breathing and bracing protect your spine by turning your torso into a stable cylinder.
Before you start the hinge, take a diaphragmatic breath. That means breathing into your belly and sides, not just your chest. Your ribs should expand in all directions. Once you’ve filled your lungs, tighten your abs like you’re bracing for impact. Hold that tension throughout the movement.
Exhale slowly as you hinge if you need to, but keep the brace. Don’t let your ribs flare up or your belly relax.
Avoid holding your breath for long periods during unloaded practice, but understand that controlled breath holding (Valsalva) is often used during heavy loaded lifts to maximize core pressure.
The “two hand rule” checks whether your spine stays neutral. Place one hand on the bottom of your ribcage and the other hand on the bony point at the front of your pelvis. As you hinge, those two points should not move closer together or farther apart.
If they do, your spine is flexing or extending.
Reset your brace and try again with a shorter range. Maintaining that distance means your torso is moving as one solid unit, which is the goal.
Breathing and bracing aren’t optional. If you skip them, your lumbar spine will compensate, and compensation under load leads to injury over time.
Identifying Common Hip Hinge Mistakes and How to Fix Them
Most hinge mistakes happen because you don’t yet feel the difference between hip movement and spine movement. Your brain defaults to familiar patterns, and if you’ve spent years bending with a rounded back, your nervous system will try to repeat that pattern even when you’re practicing something new.
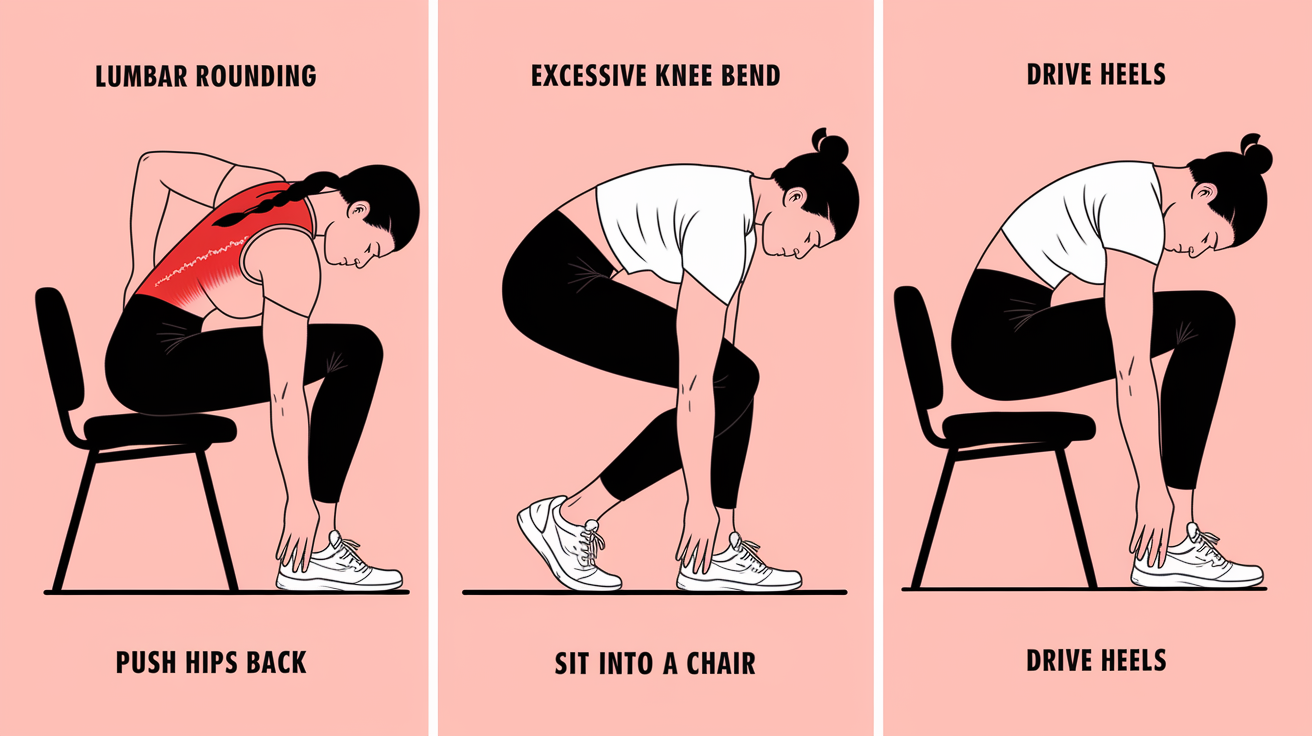
The three most common errors are lumbar rounding, excessive knee bend, and shifting weight onto your toes.
Lumbar rounding happens when you hinge too deep without enough hamstring or hip mobility. Your spine flexes to make up the difference.
Excessive knee bend turns the hinge into a squat. Your knees travel forward and your hips don’t travel back far enough.
Weight on your toes means you’re tipping forward instead of sitting back, which pulls your center of gravity out of position and loads your low back.
Corrections are simple but require attention. For rounding, reduce your range and stop the hinge earlier. Use a dowel along your back to catch the mistake in real time. For knee dominance, emphasize the cue “push your hips back” and imagine sitting into a chair behind you. For toe weighting, drive your heels into the floor and keep your weight over your midfoot.
Film yourself from the side or stand next to a mirror. Visual feedback speeds up the learning process.
| Error | Symptom | Fix |
|---|---|---|
| Lumbar rounding | Low back curves or stick loses contact with tailbone | Shorten range, brace harder, use dowel feedback |
| Excessive knee bend | Knees move forward past toes; movement looks like a squat | Push hips farther back, reduce knee travel, practice box taps |
| Weight on toes | Heels lift or torso leans too far forward | Drive heels down, shift weight to midfoot, cue “sit back” |
| Hyperextension at top | Overarching low back at lockout | Finish with neutral pelvis and tight glutes, not a lumbar thrust |
Hip Hinge Progressions: From Unloaded Practice to Weighted Exercises

Load should only be added after your hinge pattern is consistent and automatic. If you can perform 3 sets of 10 reps with a dowel along your back without losing contact, and if you can hinge to a box or wall without rounding, you’re ready to progress.
Rushing this step increases injury risk and reinforces bad habits under weight.
The first loaded step is the kettlebell deadlift. Place a kettlebell on the floor between your feet. Set up your hinge, reach down, grab the handle with both hands, brace, and stand up by driving your hips forward. The kettlebell stays close to your body.
Typical starting weights are 8 to 12 kilograms (18 to 26 pounds) for many beginners. Women often start at 8 to 12 kilograms, men at 12 to 16 kilograms (26 to 35 pounds). Adjust based on your form.
Perform 2 to 4 sets of 8 to 12 reps. If your back rounds or your knees shoot forward, go lighter or return to unloaded drills.
Romanian deadlift (RDL) mechanics are similar but the bar or kettlebell starts at hip height. You lower it under control by pushing your hips back, then return by squeezing your glutes. This teaches eccentric control and reinforces the hinge under tension.
Start with 3 sets of 6 to 8 reps using a light load. Focus on tempo: 2 to 3 seconds down, brief pause, 1 to 2 seconds up.
Kettlebell swings add a dynamic hip snap. The hinge is the same, but you finish the movement with an explosive glute contraction that drives the kettlebell forward. Start with 3 sets of 10 to 15 reps using a light bell.
Only progress to swings after your hinge is solid.
The barbell deadlift is the final progression. Use conservative sets like 3 sets of 3 to 5 reps and prioritize technique over weight. Add load slowly, week by week.
Here’s a progression checklist:
Perform 20 to 50 bodyweight hinges per session with no form breakdown for at least one week.
Pass the dowel drill and wall hinge with consistent neutral spine.
Complete 3 sets of 10 reps with a light kettlebell deadlift while maintaining form.
Practice RDL tempo work for 2 to 3 sessions before increasing load.
Introduce swings or barbell work only when you can feel your glutes drive the movement and your spine stays locked.
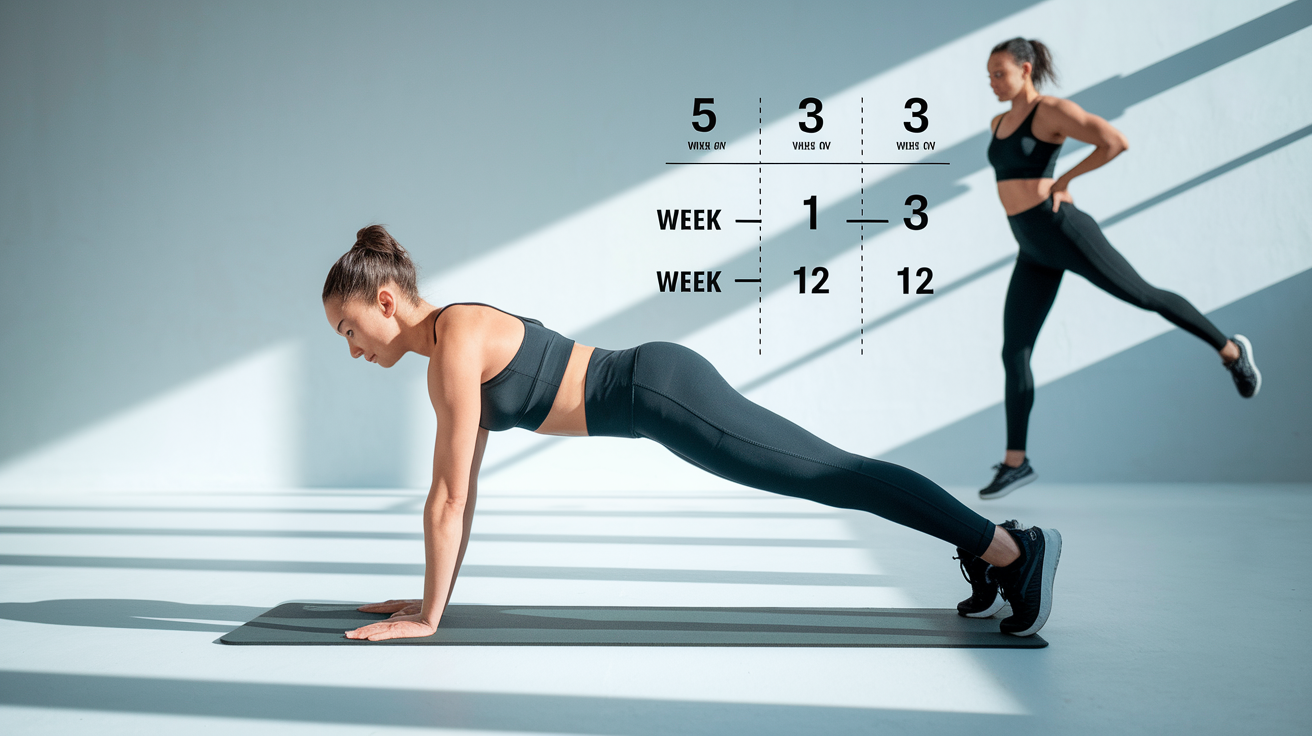
Beginner Hip Hinge Routine and Week-by-Week Practice Plan
A simple warm up prepares your hips, hamstrings, and spine for hinge practice. Start every session with Cat/Cow: 5 reps to find neutral. Follow with glute activation like glute bridges (2 sets of 10 reps) and hip mobility drills such as leg swings or 90/90 hip rotations (5 reps per side).
This takes 5 to 8 minutes and reduces the risk of compensatory movement.
Your weekly structure should include 2 to 3 hinge focused sessions. Total hinge volume per session ranges from 20 to 50 reps depending on your experience and recovery. Start on the lower end.
Tempo matters: spend 2 to 3 seconds pushing your hips back, pause briefly at the bottom, then return in 1 to 2 seconds. Controlled tempo builds proprioception and strength through the full range.
| Week | Focus | Volume Target |
|---|---|---|
| 1 | Dowel hinge + wall hinge drills | 3 sets × 8 reps, twice per week (48 total reps/week) |
| 2 | Add box taps + light kettlebell deadlift | Drills 2 × 10, KB deadlift 2 × 8 (72 total reps/week) |
| 3 | RDL practice or kettlebell swings | RDL 3 × 6 or swings 3 × 10 (54–90 total reps/week) |
Tempo and rep scheme guidelines:
Use a 2 to 3 second eccentric (hips back) to build control and feel the hamstring stretch.
Pause 0 to 1 second at the bottom to check your position before returning.
Drive the concentric (hips forward) in 1 to 2 seconds with a strong glute squeeze.
Stick to 6 to 12 reps per set during skill work. Higher reps (12+) can be used for unloaded drills.
Rest 60 to 90 seconds between sets to maintain quality without rushing recovery.
Film yourself from the side once per week. Compare your form to Week 1. You should see clearer hip travel, a more consistent spine position, and smoother transitions.
If your form breaks down, reduce volume or load and spend another week on the current step. Progress is built on consistency, not speed.
Final Words
Practice the pattern: we defined the hip hinge, showed setup cues (stance, neutral spine, brace), and gave a clear six-step execution you can use right away.
You also learned why the posterior chain matters, simple breathing and bracing tips, the drills (dowel, wall, box), common mistakes and fixes, plus a safe progression to kettlebells and barbell work.
Use this hip hinge technique guide for beginners as your checklist—practice a few times a week, track small wins, and you’ll build safe, useful strength.
FAQ
Q: How to hinge at the hips for beginners?
A: To hinge at the hips for beginners, bend from the hip joint with a neutral spine. Feet hip-width, slight knee bend, brace abs, push hips back until hamstrings feel a stretch, then drive hips forward.
Q: What are common mistakes in hip hinges?
A: Common mistakes in hip hinges are rounding the lumbar spine, excessive knee bend (squatting), shifting weight to the toes, and hyperextending at the top. Fix by pushing hips back, bracing your core, and driving through the heels.
Q: Are hip hinges good for sciatica?
A: Hip hinges can be good for sciatica if performed pain-free with a neutral spine and light loads; they load glutes and hamstrings and reduce repeated spine flexion. Stop if symptoms worsen and consult a clinician.
Q: What is a hip hinge exercise for seniors?
A: A hip hinge exercise for seniors is the box or bench tap: stand near a 16-20 inch seat, push hips back with a slight knee bend, tap the seat, then stand. Use support and limit range if needed.