

Think mobility is just stretching? That’s a dangerous shortcut.
If you don’t measure it, you’re guessing whether your work helps your lifts.
In this post you’ll get a simple, repeatable plan to track mobility and movement for squats, deadlifts, and presses.
We cover baseline tests, consistent video setups, joint-angle measurements, depth markers, pain logs, and drill tracking.
Do the same warm-up, same camera, three trials, and you’ll turn vague improvements into numbers that prove progress.
Core Methods to Track Mobility and Movement Improvements for Lifts
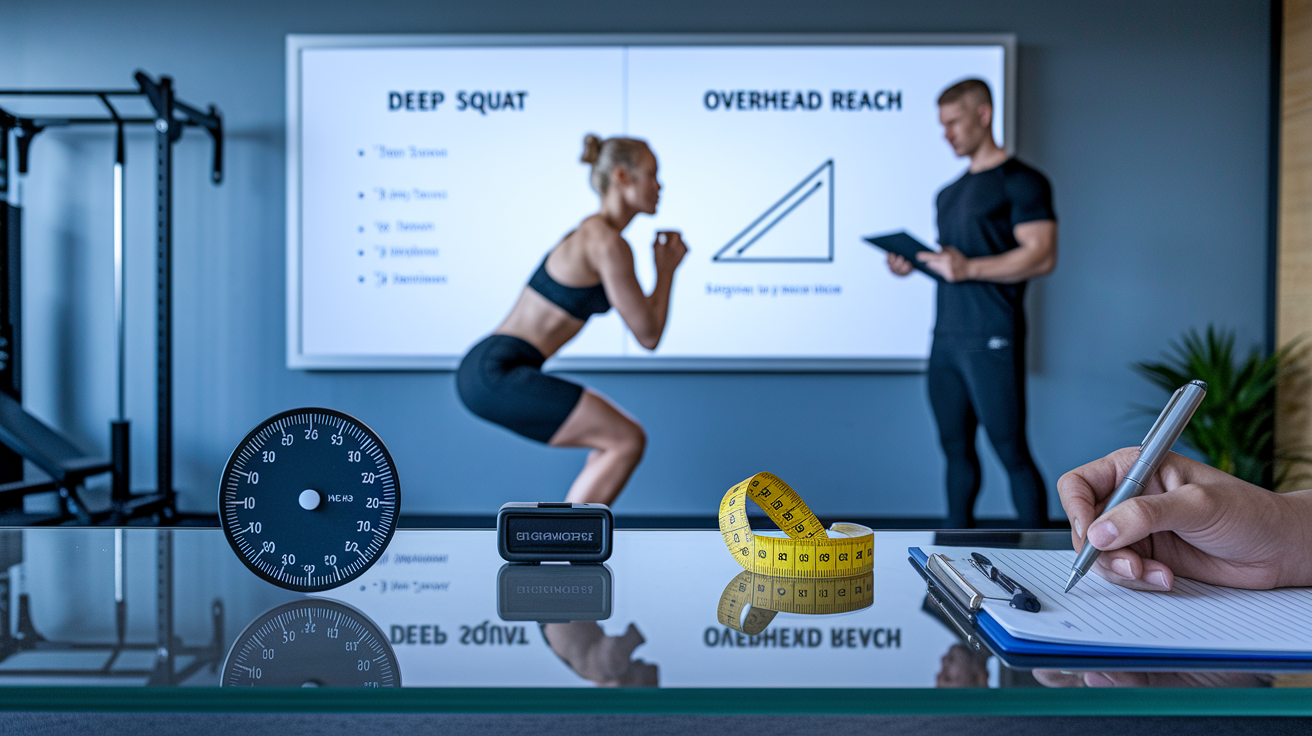
You need a reliable starting point before anything else makes sense. Before you touch a mobility program, grab video and measurements of your deep squat, overhead reach with a barbell or dowel, hip hinge, hip internal and external rotation, thoracic extension, and ankle dorsiflexion. Do all of this on the same day, right after the same warm-up—five to ten minutes of general movement plus two to four light reps of each test. Without a baseline you can actually trust, you’re just guessing.
Consistency between tests determines whether your numbers mean something or just reflect how you felt that Tuesday. Same time of day for every retest. Same warm-up. Same setup: camera distance, marker placement, shoes, floor. Run three trials of each test and average them. That’s how you filter out noise and get a number worth comparing.
Six ways to track mobility and movement gains that actually matter for your lifts:
- Side and front video of deep squats, overhead presses, deadlift setups. Same camera height and distance every session.
- Range of motion numbers with a goniometer or inclinometer at the ankle, hip, shoulder, thoracic spine.
- Depth markers or tape on the wall or rack to measure squat depth, hip position, bar height at the bottom.
- Before and after screenshots or split screens from your video to spot changes in torso angle, bar path, joint alignment.
- Pain and stiffness logs on a zero to ten scale before and after training. Note when discomfort drops or when your drills cut soreness time.
- Drill performance logs for things like couch stretch, thoracic rotations, ankle wall work. Sets, reps, hold times recorded weekly so you know if you’re actually doing the work.
Progress gets real when you can document it. A five degree or better bump in a joint angle, your hip crease dropping two centimeters lower in the squat, the bar staying within plus or minus five centimeters of vertical on an overhead press—those are genuine wins. Pair those with things like “squats feel easier” or “my lower back doesn’t lock up anymore,” and you’ve got the full picture of whether your mobility work is fixing your lifts.
Lift-Specific Mobility Tracking Metrics for Progressive Improvement

Every major lift needs its own set of checkpoints. Tracking the right things tells you if better range of motion is actually solving your technical problems. For squats, you’re watching hip crease depth relative to the top of your knee (legal depth means crease below the knee), torso lean angle at the bottom, and ankle dorsiflexion measured as how far your shin tilts from vertical. Thirty to forty degrees of ankle dorsiflexion usually lets you hit depth without your torso pitching way forward or your heels coming up.
Deadlifts and hip hinges need clean spinal alignment and enough hamstring length to reach the bar without rounding. You’re checking whether you can hinge with a neutral lumbar spine (five to ten degrees of flexion max), whether you drive from the floor without your lower back hyperextending to compensate, and your hip external rotation range (especially if you pull sumo). Side view video is your friend here. Watch whether your spine stays neutral through the pull or if things start to break down under load.
Pressing movements like bench and overhead press run on shoulder and thoracic mobility. Track shoulder flexion (can you get around 170 degrees overhead without arching your lower back to cheat it?), thoracic extension (twenty to thirty degrees measured with an inclinometer), and where your scapulae sit during setup and lockout. Poor shoulder or thoracic range shows up as elbow flare, incomplete lockout, or shoulder pain when the weight gets heavy.
| Lift | Key Mobility Metric | Measurement Method | Benchmark |
|---|---|---|---|
| Back Squat | Ankle dorsiflexion, hip crease depth | Inclinometer on tibia; video hip vs. knee | 30–40° DF; crease below knee |
| Deadlift (Conv/Sumo) | Hip hinge angle, lumbar neutrality | Side video; measure spine angle | ≤5–10° lumbar flexion at start |
| Bench Press | Thoracic extension, shoulder ER | Inclinometer on T-spine; goniometer | ≥20–30° T-extension; 90°+ ER |
| Overhead Press / Snatch | Shoulder flexion, bar alignment | Goniometer; video bar path | ~170° flexion; bar ±5 cm midline |
Reliable Range-of-Motion Measurement Tools for Tracking Lift Mobility

Accurate measurement comes down to consistent landmarks and simple, repeatable tools. A basic plastic goniometer (eight to thirty bucks) measures joint angles at your hip, knee, ankle, shoulder. A digital inclinometer or smartphone inclinometer app (free to twenty dollars) tracks spinal extension, rotation, limb tilt. A standard tape measure handles linear reach tests like knee to wall ankle dorsiflexion distance in centimeters. All three are cheap, portable, and give you objective numbers you can log and compare week to week.
Where you place the tool matters more than the tool itself. For ankle dorsiflexion, stick the inclinometer flat on the front of your shin with your knee against a wall and measure the angle from vertical. For hip flexion with an active straight leg raise, line up the goniometer axis at the greater trochanter, one arm along your femur and one along your torso. For shoulder flexion, position the axis at the acromion with arms aligned along the humerus and torso. Consistent landmarks kill most of the drift you’d otherwise see between sessions.
Tools and what they’re for:
- Universal goniometer for hip, knee, shoulder, elbow joint angles.
- Digital inclinometer or smartphone app for spinal extension, tibial angle, rotation measurements.
- Tape measure or ruler for knee to wall ankle tests and overhead reach distance.
- Joint markers like tape or stickers at the greater trochanter, lateral knee, lateral malleolus, acromion to improve video angle analysis.
- Tripod or stable phone mount so your camera stays in the exact same spot every test session.
Minimal detectable change sets the bar for what counts as real improvement. A joint angle change of five degrees or better, or a reach test improvement of one to two centimeters, usually clears measurement error and represents genuine progress. Smaller changes might just be daily variation, warm-up differences, or you measuring slightly off rather than actual mobility gains.
Video Analysis Techniques for Tracking Movement Improvements in Lifts

Video captures what you can’t feel, which makes it the most practical tracking tool you’ve got. Set up your camera on a tripod at hip height, one and a half to two meters away for side views and two to three meters for frontal views. Film at sixty frames per second minimum. 120 fps is better if you’re catching fast phases in Olympic lifts. Keep the camera perpendicular to the plane of motion so angles don’t get warped by perspective.
Mark key joints with small pieces of tape before you hit record. Stick markers on the greater trochanter (hip), lateral femoral condyle (knee), lateral malleolus (ankle), acromion (shoulder). For barbell tracking, mark the center of the bar or use a high contrast sleeve. These markers make it simple to draw angle lines in video software and measure changes frame by frame.
Bar path improvements are one of the clearest signs that your mobility work is actually transferring to better technique. Overlay your baseline video with a follow-up session using apps like Kinovea, Hudl Technique, or Coach’s Eye and compare the bar’s path relative to mid-foot. A more vertical bar on squats or overhead presses, or a straighter pull on deadlifts, often lines up with improved ankle, hip, or thoracic range. Frame by frame review also reveals compensations like knee valgus, lumbar rounding, or shoulder shrugging that show up under fatigue or heavier loads.
Camera Setup and Joint Marker Placement
Position your camera at a consistent height, roughly one to one point two meters or hip level for most people, and lock the tripod in place. Measure the distance from the camera to the center of the lifting platform and record it in your log so you can replicate the setup every retest. Use the same lens or zoom setting each time to keep your field of view from changing.
Place joint markers directly over anatomical landmarks. Hip marker goes on the bony bump of the greater trochanter. Knee marker sits on the lateral condyle, that bump on the outside of your knee. Ankle marker goes on the lateral malleolus, the outside ankle bone. Shoulder marker sits on the acromion process, the bony point at the top of your shoulder. These landmarks stay in roughly the same place no matter how much muscle you gain or what you’re wearing, which keeps your angle measurements valid across months of training.
Using Mobility Screening Tests to Measure Improvements for Lifts
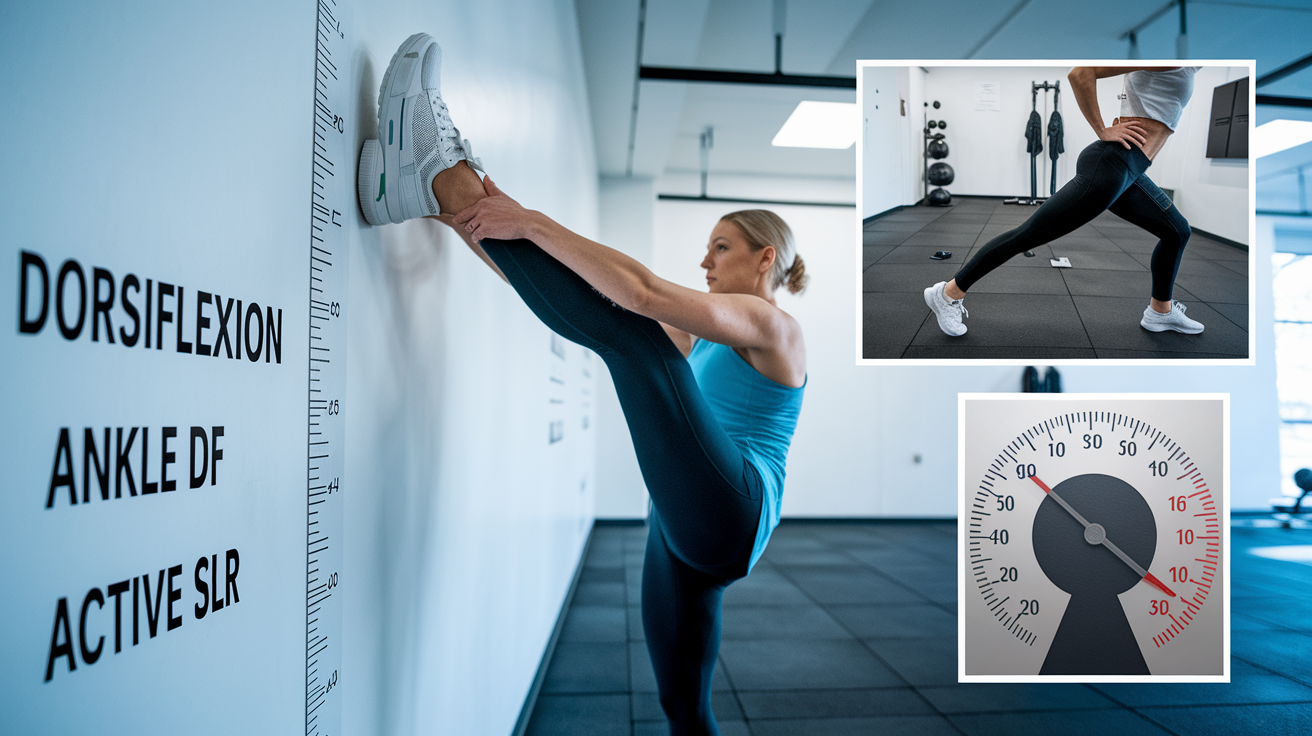
A baseline mobility screening gives you specific numeric targets to chase. The most lift relevant tests include ankle dorsiflexion with a knee to wall lunge, hip flexion using an active straight leg raise, hip internal and external rotation at ninety degrees hip flexion, thoracic extension measured seated or standing, shoulder flexion with an overhead reach, and a deep bodyweight squat. Do all tests after a standard five to ten minute warm-up, record three trials, average the results.
Ankle dorsiflexion gets measured with a weight bearing lunge. Stand facing a wall, one foot forward with your knee touching the wall, and slide the foot back until your heel just lifts off the floor. Measure the distance from your big toe to the wall in centimeters, or stick an inclinometer on your shin and record the tibial angle from vertical. Functional targets often land around eight to twelve centimeters toe to wall distance or thirty to forty degrees tibial inclination. Limited ankle dorsiflexion restricts squat depth and forces too much forward lean or heel lift.
Thoracic extension directly affects overhead lockout stability and bench press arch. Measure it seated with your hips and knees at ninety degrees to isolate the thoracic spine. Place an inclinometer at the upper back, around T1 to T4, and extend backward without arching your lower back. A target of twenty to thirty degrees is typical for strong, stable overhead positions. Hip internal and external rotation get tested lying on your back with hip and knee bent to ninety degrees. Rotate the lower leg inward to test external rotation of the hip, outward to test internal rotation, measuring the angle with a goniometer. Working benchmarks are roughly twenty-five to thirty-five degrees for hip internal rotation, which matters especially for sumo deadlifts and wide stance squats.
Seven major screening tests to include in your baseline:
- Ankle dorsiflexion, knee to wall style. Measure distance or tibial angle. Retest every two to four weeks.
- Active straight leg raise. Hip flexion with knee straight. Target seventy to eighty degrees or better.
- Hip internal rotation, 90/90 position. Measure degrees. Compare left and right.
- Hip external rotation, 90/90 position. Measure degrees. Asymmetries over ten degrees matter.
- Thoracic extension, seated. Inclinometer on upper back. Target twenty to thirty degrees or more.
- Shoulder flexion, overhead reach. Active overhead with dowel or bar. Target around 170 degrees.
- Deep bodyweight squat. Video from side and front. Note hip crease depth and torso angle.
Control your warm-up and fatigue state for every retest. If you test fresh one week and after a heavy squat session the next, the numbers won’t line up. Schedule retests on the same day of the week, same time, same warm-up. Small weekly checks of one or two quick tests help you stay on top of trends, and a full formal retest every four to six weeks gives you the data to confirm real progress.
Objective and Subjective Metrics for Tracking Mobility Improvement in Lifts

Pairing hard numbers with how things feel makes your tracking system more complete. Objective metrics include joint angles, squat depth with hip crease relative to knee, bar path alignment, and ROM measurements in degrees or centimeters. Subjective metrics include pain ratings on a zero to ten scale, daily stiffness levels, movement confidence, how long soreness lasts after training, and how easy it feels to hit positions. When both sets of metrics trend positive at the same time, you know the work is paying off.
Asymmetry scoring reveals compensation patterns that can lead to technique breakdown or injury. Measure both sides for every test and calculate the difference. Asymmetries greater than ten to fifteen percent (for example, left hip internal rotation twenty-five degrees and right thirty-five degrees) often predict one sided technique drift, uneven bar paths, or preferential loading. Track these asymmetries over time and prioritize corrective work on the weaker side until the gap narrows.
Five subjective metrics to track consistently:
- Pain rating, zero to ten, before, during, and after training sessions. Note location and type—sharp, dull, achy.
- Soreness duration. How many hours or days post session until normal movement returns.
- Movement confidence. Do positions feel more stable, controlled, and repeatable under load?
- Ease of warm-up. How many reps or minutes does it take to feel ready to lift?
- Compensation patterns. Do you notice yourself shifting weight, rounding your back, or flaring elbows less often?
Consistent logging increases reliability. Use a simple spreadsheet or notebook with columns for date, warm-up, test name, objective value, subjective rating, and notes. Over weeks, patterns emerge. If ankle dorsiflexion increases by five degrees but squat depth doesn’t improve and you still report tight calves, you may need to add ankle loaded drills or address a different limiting factor like hip flexion or motor control.
Tracking Mobility Progress Over Time for Lift Performance Gains

Mobility improvements typically show up in measurable form within two to six weeks if you’re consistent with targeted drills and retesting. Short term gains often show up as small angle increases, three to seven degrees, or improved depth in unloaded tests. Medium term changes at six to twelve weeks are where you expect to see those gains transfer into loaded lifts: deeper squats under the bar, cleaner overhead lockouts, more controlled hinge patterns in deadlifts.
Set up a weekly or monthly tracking sheet with columns for date, mobility metric, drill performed (sets, reps, hold time), and the corresponding lift metric like 1RM, depth, bar path, pain level. For example, log ankle dorsiflexion degrees, the number of wall mobilization sets you completed that week, and your back squat depth or 1RM. Over time, you can plot these variables and look for connections. Does a five degree increase in ankle dorsiflexion line up with a five to ten percent deeper squat or a five kilogram bump in your working sets?
Percent change and effect size reporting help you interpret whether a change actually matters. Calculate percent change as new value minus baseline value, divided by baseline value, times 100. For instance, if your baseline ankle dorsiflexion was twenty-eight degrees and you retest at thirty-five degrees, that’s a plus seven degree change or plus twenty-five percent improvement. Meaningful change guidelines suggest five degrees or better for joint angles or one to two centimeters for linear reach tests. Anything below that threshold may be measurement noise or daily variation.
| Time Frame | What to Track | Typical Improvements |
|---|---|---|
| 2–6 weeks | Weekly quick checks (1–2 key tests), drill compliance logs | 3–7° joint angle gains; 1–2 cm depth or reach improvements |
| 6–12 weeks | Full baseline retest battery, lift performance metrics (1RM, depth, bar path) | 5–10° sustained gains; noticeable technique improvements; reduced compensations |
| 12+ weeks | Quarterly performance review, asymmetry resolution, maintenance protocols | Stable ROM gains; lift PRs or technique milestones; minimal pain or stiffness reports |
Applying Mobility Tracking Data to Adjust Lift Technique

Mobility data shows you where restrictions are limiting your technique and guides your corrective priorities. If video and goniometer measurements reveal limited ankle dorsiflexion and your squat depth is stuck with too much forward lean, you know to prioritize ankle work. Wall mobilizations, loaded lunge holds, or elevated heel squats before you chase more hip or thoracic drills. If thoracic extension tests low and your overhead press lockout feels unstable or painful, thoracic extensions over a foam roller and segmental rotations become your focus.
Strength training itself can improve range of motion. Research shows that full range resistance training often produces ROM gains similar to static stretching, especially when you load end ranges with control. Your mobility work doesn’t have to be separate from your lifting. Deep goblet squats, paused front squats, overhead walking lunges, and controlled eccentrics all build strength and mobility at the same time. Use your tracking data to decide when to add these loaded drills and when to stick with unloaded mobility work.
Correlating hip rotation measurements with deadlift stance choices is a practical example. If hip internal rotation is limited, say fifteen degrees when the target is twenty-five to thirty-five degrees, switching from sumo to conventional may reduce hip impingement and allow a cleaner pull. Conversely, if hip external rotation is restricted, a narrower conventional stance might feel more natural. Track both your hip rotation numbers and your deadlift technique (bar path, lumbar position, ease of lockout) to find the stance that matches your current mobility and allows the safest, strongest pull.
Choosing the Right Corrective for the Right Limitation
Match your deficit to the drill with the strongest evidence and clearest carryover. Limited ankle dorsiflexion responds well to weight bearing ankle mobilizations like knee to wall lunges, banded ankle distractions, and loaded end range holds like the bottom of a goblet squat. Thoracic extension restrictions improve with foam roller extensions, cat cow cycles, and quadruped rotations. Shoulder flexion deficits benefit from wall angels, band pull aparts, and active overhead reaches with a dowel.
Don’t scatter your effort. If your baseline tests show three or four limitations, pick the one or two that most directly restrict your main lifts and work those for four to six weeks. Retest to confirm progress, then add or shift focus to the next priority. This focused approach prevents program bloat and keeps your mobility work sustainable within a ten to twenty minute daily window.
Templates and Case Examples for Tracking Mobility Improvements in Lifts

A simple tracking template keeps all your data in one place and makes trends obvious. Use a spreadsheet with columns for date, test name, side (L/R if applicable), trial values (three per test), average, drill performed (name, sets, reps, hold time), related lift metric (load, depth, bar path notes), and a notes field for pain, fatigue, or other observations. Update it weekly for quick checks and every four to six weeks for formal retests.
Sample four week log structure:
| Date | Test | Value (avg of 3 trials) | Drill Performed | Notes |
|---|---|---|---|---|
| 2026-03-01 | Ankle DF (R) | 28° | Wall mobilizations 3×10; couch stretch 2×30s | Tight calves; squat depth limited |
| 2026-03-15 | Ankle DF (R) | 32° | Wall mobilizations 3×12; goblet squat holds 3×20s | Depth improved ~2 cm; less heel lift |
| 2026-03-29 | Ankle DF (R) | 35° | Same drills + single-leg RDL 3×8 | Back squat 1RM +5 kg; clean lockout, no compensations |
| 2026-04-12 | Ankle DF (R) | 36° | Maintenance: wall mobs 2×8; goblet holds 2×15s | Stable depth; shift focus to hip IR next block |
Compliance with your mobility drills matters as much as the drills themselves. Log every session, even short five minute movement snacks, so you can see whether weeks with higher drill volume line up with bigger metric jumps. If you skip mobility work for two weeks and your retest shows no change or a slight regression, that’s useful feedback. Consistent documentation turns hunches into evidence.
Four example case scenarios to guide your own tracking:
- Squat mobility. Baseline ankle DF twenty-eight degrees, hip IR eighteen degrees. After eight weeks of targeted drills (wall mobs, 90/90 hip rotations, couch stretch), ankle DF goes to thirty-six degrees, hip IR to twenty-eight degrees. Squat depth improved from hip crease two centimeters above knee to three centimeters below. Back squat 1RM up ten kilograms with cleaner technique.
- Overhead press. Baseline shoulder flexion 160 degrees, thoracic extension fifteen degrees. After six weeks of wall angels, foam roller extensions, and overhead holds, shoulder flexion goes to 172 degrees, thoracic extension to twenty-six degrees. Overhead press bar path plus or minus three centimeters of midline (previously plus or minus eight centimeters). Less shoulder impingement pain, eight out of ten down to two out of ten.
- Deadlift hinge. Baseline hip hinge test showed twelve degrees lumbar flexion at bar height. After four weeks of RDLs, single leg work, and hip hinge drills, lumbar flexion reduced to six degrees. Conventional deadlift bar speed improved, lumbar rounding eliminated on heavy singles.
- Asymmetry reduction. Left hip IR twenty degrees, right hip IR thirty-five degrees at baseline. Focused corrective work on left side with 90/90 stretches, banded hip rotations. Eight week retest: left thirty degrees, right thirty-six degrees. Gap reduced from fifteen degrees to six degrees. Squat bar path more symmetrical, no left knee valgus under load.
Final Words
Record a baseline screen now: deep squat, overhead reach, hip hinge and ankle dorsiflexion. Film lifts from the side and front and mark joints so future videos match.
Use easy tools: smartphone video, a tape measure or inclinometer, and test at the same time of day. Retest every 2 to 6 weeks, log numbers and how the lift felt, and watch for about 5° or 1 to 2 cm changes.
Following these simple steps for how to track mobility and movement improvements for lifts will turn guesses into measurable progress. Stick with it; small wins add up fast. You’ve got this.
FAQ
Q: What is the 3 3 3 rule for weight lifting?
A: The 3 3 3 rule for weight lifting is three sets of three reps per main lift, using heavy, controlled loads to build maximal strength while keeping volume low and technique clean.
Q: What is the 5-3-1 rule in gym?
A: The 5-3-1 rule is a four-week strength cycle: week 1 uses five-rep work, week 2 three-rep work, week 3 one-rep heavy sets, and week 4 is a lighter deload based on a training max.
Q: What is the 2 2 2 rule in the gym?
A: The 2 2 2 rule in the gym is performing two sets of two reps for a lift, focusing on near-maximal loads to practice heavy technique, keep fatigue low, and build raw strength.
Q: What is the 5 4 3 2 1 method of lifting?
A: The 5 4 3 2 1 method of lifting is a descending-rep pyramid, five reps down to one, increasing weight each set to develop strength and speed while managing fatigue within a session.