

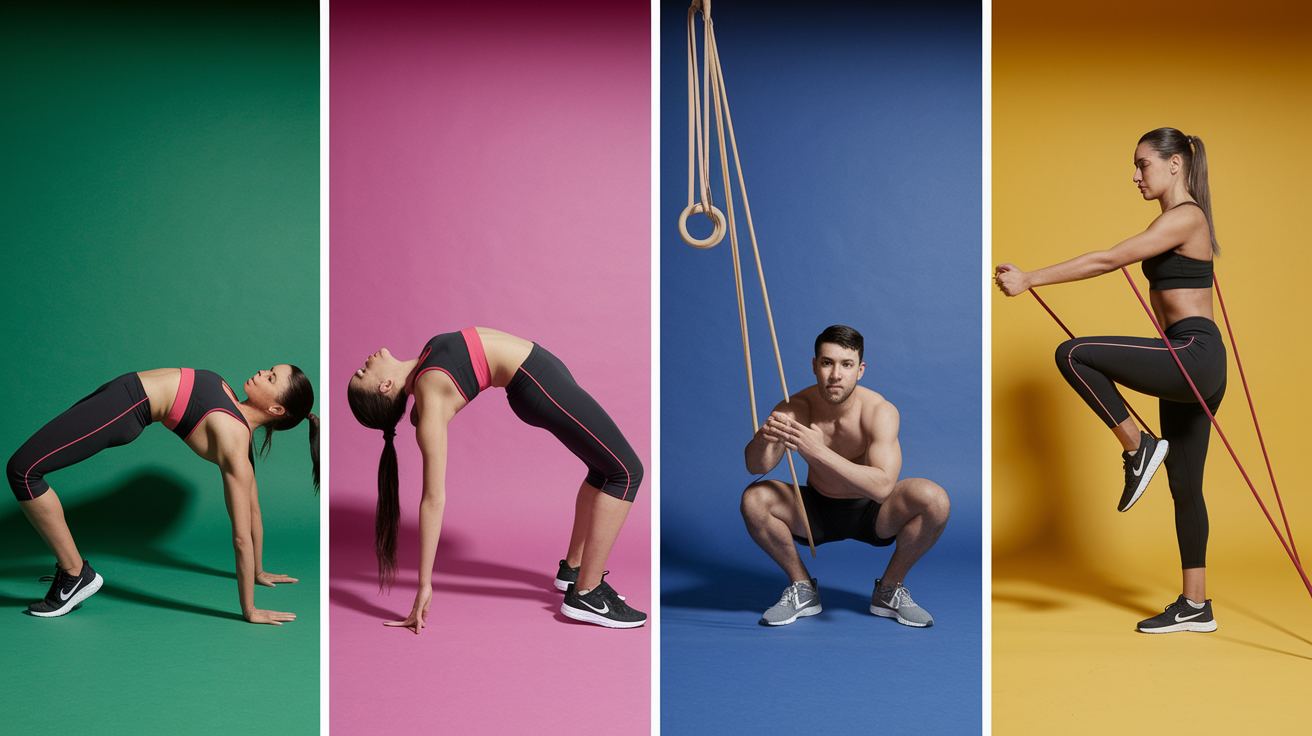
Think resistance bands are only for warm-ups?
Resistance Band Leg Exercises can build real strength, not just mobility.
They give constant tension through each rep, target glutes, quads, hamstrings, and hip stabilizers, and they’re kinder to sore knees.
No rack, no heavy plates, just a loop, a little space, and a plan you can repeat.
This post shows the core moves, how to pick the right band, and simple progressions to get a stronger lower body at home.
Essential Overview of Lower-Body Resistance Band Training
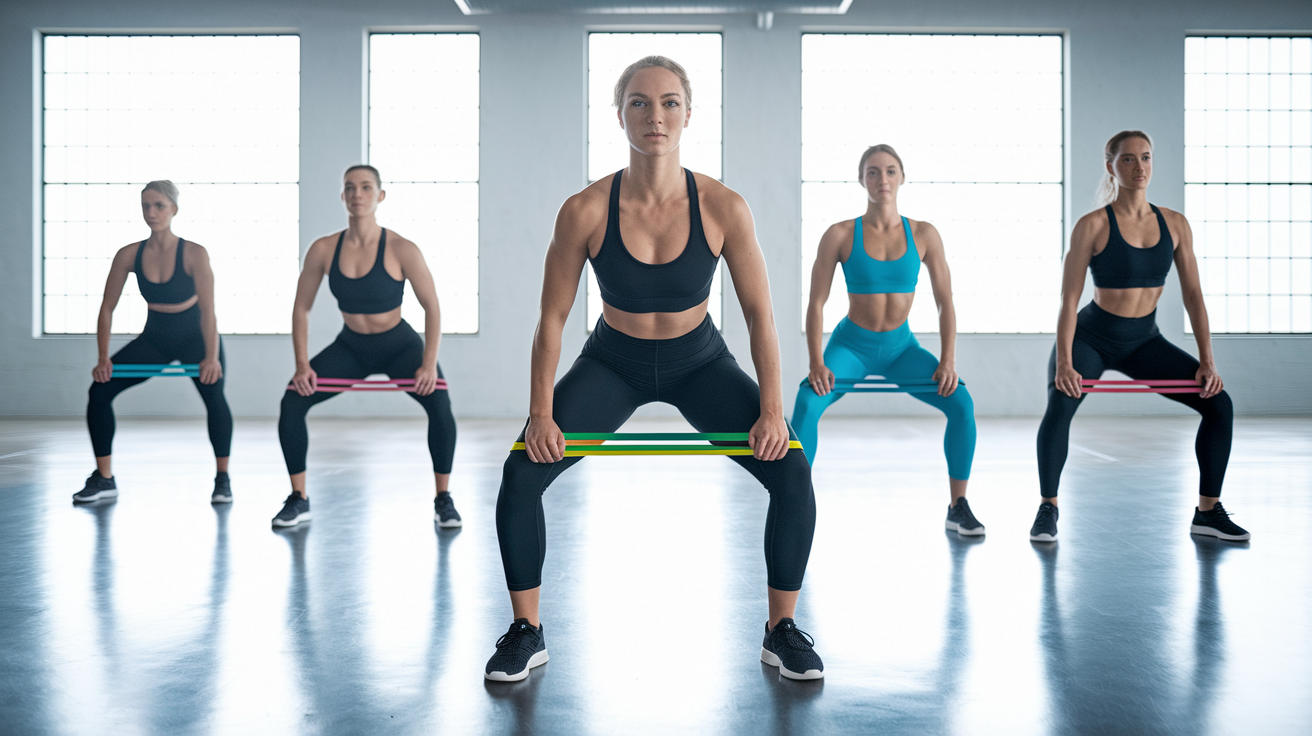
Resistance band leg exercises include Fire Hydrants (hip abduction to strengthen gluteus medius), Band Squats (vertical push to load quads and glutes), Glute Bridges (hip extension against loop tension), Lateral Walks (side-step drills for hip stabilizers), and Standing Kickbacks (single-leg posterior chain work). These movements use elastic resistance to create continuous tension across the full range of motion, challenging muscles during the lift, the lower, and even the hold. When you squat with a band looped above your knees, your hip abductors have to actively push outward to prevent the knees from collapsing inward, engaging muscles that often get ignored in bodyweight-only or barbell movements. That same constant tension applies whether you’re pressing a leg back against the band, pulsing a bridge at the top, or shuffling sideways in a mini-loop walk.
Bands are portable, cost-friendly, and adaptable to nearly any floor space, from a hotel room to a garage to a park. One medium loop band and a yoga mat can deliver a complete lower-body session that targets glutes, quads, hamstrings, hip abductors, and core stabilizers. Because the resistance scales with how far you stretch the band, the hardest part of each movement (the peak contraction) receives the most load, which helps build strength in positions where muscles are fully shortened or lengthened. Research comparing elastic resistance to traditional weights has found similar strength gains when volume and progressive overload are matched, making bands a valid tool for muscle building and not just mobility warm-ups.
The five core movement categories for banded leg training are:
• Squats (vertical push patterns)
• Bridges (horizontal hip extension)
• Kicks (single-leg extension and abduction)
• Lifts (leg raises for hip flexors and abductors)
• Walks (lateral and diagonal stepping patterns)
Key Benefits of Resistance Band Leg Exercises
Constant tension is the defining feature of elastic resistance. Unlike free weights, where momentum can carry you through a repetition and gravity provides resistance only in one direction, a resistance band fights you on the way up, on the way down, and during the pause. In a banded glute bridge, the band resists as you drive your hips toward the ceiling (concentric), resists as you lower under control (eccentric), and still applies outward force when you hold at the top (isometric). That triple-phase engagement increases time under tension per set, which is a key driver of hypertrophy and strength adaptation. Beginners often notice improved muscle endurance and coordination within a few weeks because the band teaches the nervous system to maintain tension throughout the entire range of motion.
Resistance band leg exercises strengthen the gluteus maximus, gluteus medius, gluteus minimus, quadriceps, hamstrings, hip flexors, and deep core stabilizers. Because many band drills require you to resist lateral or rotational forces (clamshells, lateral walks, fire hydrants), they train the frontal and transverse planes of motion that runners, lifters, and desk workers often neglect. Strengthening the gluteus medius and hip external rotators improves pelvic stability, which can reduce knee valgus (knees caving inward) during squats, jumps, and running strides. Improved hip stability also supports better posture and a more balanced gait, translating into fewer compensatory movement patterns that lead to low-back or IT-band issues over time.
Portability and knee-friendly loading make bands accessible for travel, home gyms, and people managing joint sensitivity. A rolled-up loop band fits into a carry-on. There are no plates to load or racks to set up. Bands distribute tension smoothly across the muscle, avoiding the high compressive and shear forces that can aggravate patellar tendinopathy or patellofemoral pain when heavy weights are used with poor form. That makes banded squats, bridges, and walks valuable tools for rehab progressions and strength maintenance during deload weeks. With consistent progressive overload (heavier bands, slower tempo, more sets), experienced lifters can expect measurable strength and muscle-size changes within six to twelve weeks.
Choosing the Right Resistance Bands for Leg Exercises

Resistance bands for leg training fall into four main categories: mini loop bands (also called booty bands), large loop bands, tube bands with handles, and flat therapy bands. Mini loop bands are short fabric or latex circles, typically 12 to 18 inches in circumference, designed to sit above the knees or around the ankles. Large loop bands are continuous rubber loops, often 41 inches around, that can be doubled, stepped on, or wrapped to adjust tension. Tube bands feature a length of rubber with plastic or foam handles at each end and sometimes include door anchors or ankle cuffs. Flat therapy bands (such as Theraband strips) are sold by the yard and color-coded by resistance level, often used in physical therapy and easily cut or tied to create custom-length loops.
Most leg exercises in this guide assume a looped band because loops stay in place better than tubes, don’t require handles during floor work, and can be positioned above the knees, around the ankles, or across the arches of the feet without slipping. Cloth-covered mini loops feel more comfortable against bare skin and grip clothing or shoes without rolling, while rubber loops offer higher peak resistance and durability. Resistance levels are usually labeled light, medium, heavy, and extra-heavy, though some manufacturers use color codes (yellow, red, green, blue, black) that vary by brand. A beginner who’s never done structured lower-body training should start with a light or medium band for activation drills and a medium or heavy band for squats and bridges. If you already squat or deadlift with a barbell, you’ll likely need a heavy or extra-heavy loop to feel challenged in bilateral movements.
When to use each band type:
• Mini loop band: lateral walks, diagonal walks, clamshells, fire hydrants, or any drill where the band stays above the knees or around the ankles and movement is small and controlled.
• Large loop band: squats, glute bridges, standing kickbacks, leg lifts, or exercises where you can step into the loop and anchor one end under a foot or around a stable post.
• Tube band with handles: less common for the leg exercises in this guide. Best for standing abduction or adduction when you prefer a handle grip and adjustable-length attachment.
• Flat therapy band: useful for wrapping around the sole of a shoe during tabletop kickbacks or creating a custom-length tie if you don’t have a loop.
| Band Type | Best Use Case |
|---|---|
| Mini loop band | High-rep glute activation, lateral/diagonal walks, above-knee or ankle placement |
| Large loop band | Squats, bridges, standing kickbacks; can be doubled or tied for extra tension |
| Tube band with handles | Standing leg work when anchored to a door or post; less practical for floor drills |
| Flat therapy band | Custom-length loops, wrap around foot arches, budget-friendly rehab or travel option |
How to Progress With Resistance Band Leg Exercises
Progressive overload with resistance bands means gradually increasing the mechanical demand on your muscles over weeks and months. Because you can’t add a five-pound plate to a band, you manipulate tension by choosing a thicker or shorter band, performing more repetitions, adding sets, slowing the tempo, or moving to single-leg variations. A beginner might start with one set of twelve banded squats using a medium loop, rest ninety seconds, and call it done. Four weeks later, that same person can complete three sets of fifteen squats with the same band, signaling improved strength-endurance. At that point, switching to a heavy band and dropping back to two sets of twelve reps reintroduces the overload stimulus and drives further adaptation.
Single-leg progressions are especially effective because they double the relative resistance on the working limb and recruit more stabilizer muscles. For example, once you can perform twenty smooth glute bridge pulses with a band above your knees, try fifteen single-leg glute bridge pulses per side. The band still resists knee collapse, but now one glute must generate all the hip extension force while the other leg floats. Tempo manipulation works the same way. A two-second pause at the bottom of a squat or a four-second eccentric on a standing kickback increases time under tension without changing the band or reps, forcing the muscle to sustain contraction longer and building strength in stretched positions.
Six steps to apply progressive overload with loop bands:
- Increase reps within your current set scheme (example: 12 reps to 20 reps before adding sets).
- Add one set per exercise every two weeks until you reach three sets (1 set to 2 sets to 3 sets).
- Switch to a heavier resistance band once you can complete all prescribed reps with two reps left in reserve.
- Double a large loop band or shorten the effective length by wrapping it around your hand or tying a knot to create a tighter mini loop.
- Slow the tempo (two-second pause at peak contraction, four-second eccentric) to extend time under tension.
- Progress to single-leg or single-arm variations (single-leg bridge, single-leg kickback, single-leg lateral step) to increase load per limb and challenge balance.
Full Exercise Library: 10 Essential Resistance Band Leg Exercises

The ten exercises in this library cover all major lower-body movement patterns and muscle groups. Each drill has a specific purpose, from activating underactive glutes before a run or squat session to building single-leg stability for injury prevention. Some exercises use a mini loop placed above the knees to resist knee collapse, while others require a band around the ankles or arches to load hip extension, abduction, or flexion. Organizing these movements by function (activation, strength, and dynamic patterning) helps you understand which drills to prioritize during warm-up, which to use as main strength work, and which to program for endurance or metabolic conditioning.
Activation drills wake up the glutes and hip stabilizers with short-range, high-tension movements performed before heavier lifts or runs. Strength exercises are loaded bilateral or unilateral patterns (squats, bridges, lifts) where you accumulate volume and progressive overload to build muscle and force production. Dynamic movement patterns like walks and kickbacks train coordination, balance, and frontal-plane strength that translates into better gait mechanics and lateral athleticism.
The ten essential resistance band leg exercises grouped by category:
Activation Drills
• Fire Hydrants
• Tabletop Glute Kickbacks
• Clamshells
Strength Exercises
• Glute Bridge Pulses
• Glute Bridge with Alternating Leg Raise
• Resistance Band Squats
• Resistance Band Leg Lifts
Dynamic Movement Patterns
• Standing Glute Kickbacks
• Lateral Band Walk
• Diagonal Band Walk
Step-by-Step Guide: Glute Activation Resistance Band Exercises
Glute activation drills are short-range movements designed to recruit the gluteus medius, gluteus minimus, and deep hip external rotators before compound lower-body work. These muscles stabilize the pelvis during single-leg stance, prevent knee valgus during squats and lunges, and counteract the hip internal rotation and forward tilt that develop from prolonged sitting. Performing two or three activation exercises for ten to twenty slow, controlled reps per side before your main workout primes the nervous system to fire these stabilizers during heavier loads, improving squat depth, reducing compensatory low-back extension, and decreasing injury risk over time.
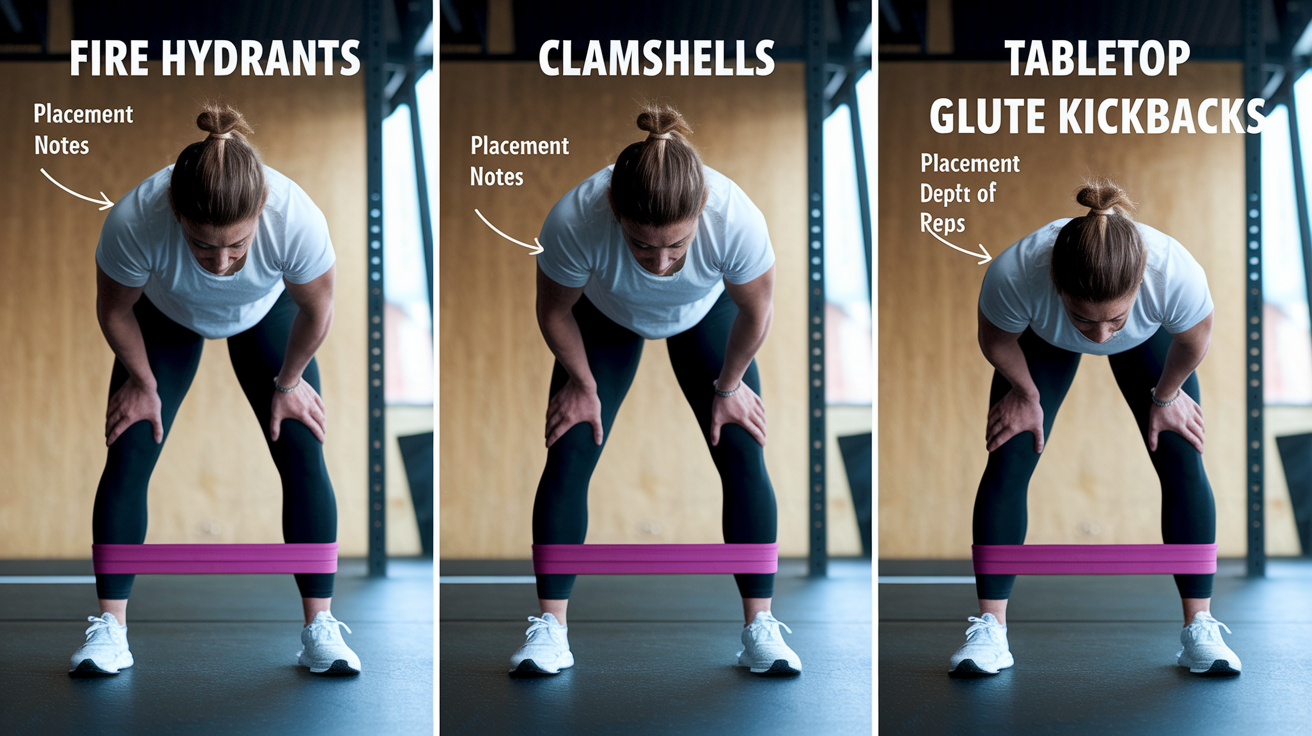
Fire Hydrants
Fire Hydrants target the gluteus medius and minimus by moving the thigh into abduction and external rotation while the torso remains stable. Start on all fours with hands under shoulders, knees under hips, and a mini loop band positioned just above both knees. Engage your core to keep your low back neutral. Imagine balancing a cup of water on your lower back. Shift your weight slightly onto your right hand and knee, then lift your left knee out to the side without rotating your hips or letting your torso lean. Your thigh should rise until it’s roughly parallel to the floor, forming a 90-degree angle at the hip and knee, like a dog at a fire hydrant. Pause for one second at the top, squeeze the left glute, then lower with control. Complete all reps on one side before switching.
• Band placement: Mini loop above both knees.
• Reps and sets: 12 to 20 slow reps per side; 1 to 3 sets.
• Primary muscles: Gluteus medius, gluteus minimus, tensor fasciae latae.
• Common mistake: Shifting the hips or arching the low back to create the appearance of more range. Keep hips level and movement isolated to the hip joint.
Clamshells
Clamshells isolate hip external rotation and abduction in a side-lying position, making them ideal for targeting weak gluteus medius without compensatory movement from the low back or quads. Lie on your right side with hips and knees both bent to 90 degrees, ankles together, and a mini loop band above both knees. Stack your left hip directly over your right hip. Place your left hand on the floor in front of your chest or rest it on your left hip to monitor alignment. Keeping your feet together and your pelvis stable, lift your left knee as high as you can without letting your top hip roll backward. You should feel tension in the outer glute and outer thigh of the top leg. Pause at the top, then lower under control. After completing all reps on one side, roll over and repeat on the other.
• Band placement: Mini loop above both knees.
• Reps and sets: 10 to 15 reps per side; 1 to 3 sets.
• Primary muscles: Gluteus medius, gluteus minimus, piriformis.
• Common mistake: Rolling the top hip backward to gain range. Keep hips stacked vertically and movement pure hip rotation.
Tabletop Glute Kickbacks
Tabletop Glute Kickbacks combine hip extension with core anti-extension stability, training the glutes, hamstrings, and deep abdominals simultaneously. Start on all fours with a mini loop or large loop band wrapped around the arches of both feet. Hands are under shoulders, knees under hips, and your back is flat. Brace your core as if someone’s about to press down on your low back. Keeping your right knee bent at 90 degrees, press your right foot straight back and up until your thigh is parallel to the floor and the sole of your shoe points toward the ceiling. The band should be taut at the top of the movement. Pause, squeeze your right glute hard, then return your knee to the starting position without letting your low back sag. Complete all reps on one side before switching.
• Band placement: Loop around the arches of both feet.
• Reps and sets: 10 to 20 reps per side; 1 to 3 sets.
• Primary muscles: Gluteus maximus, hamstrings, erector spinae, rectus abdominis.
• Common mistake: Kicking the leg up instead of extending it back; hyperextending the low back to gain height. Keep the movement controlled and maintain a flat back throughout.
Resistance Band Lower-Body Strength Exercises (Squats, Bridges, Lifts)
Strength exercises use higher volume, bilateral or unilateral loading, and progressive resistance to build muscle size and force production in the quads, glutes, hamstrings, and hip stabilizers. These movements are the backbone of a banded leg session and should be programmed with sufficient sets, reps, and rest to allow for progressive overload. Unlike activation drills, which use light bands and short ranges of motion, strength exercises challenge full-range patterns under continuous tension, often for twelve to twenty reps per set and two to three sets per exercise.
Glute Bridge Pulses
Glute Bridge Pulses keep the hips elevated and muscles under constant tension, emphasizing the peak contraction of the glutes and training the pelvic floor and outer thighs to resist the inward pull of the band. Lie on your back with knees bent, feet flat on the floor hip-width apart, and a mini loop band positioned just above your knees. Press through your heels to lift your hips until your body forms a straight line from shoulders to knees. From this top position, push your knees outward against the band and perform small, controlled pulses by lowering your hips one to two inches and driving back up. Each pulse should take one to two seconds. Maintain outward knee pressure throughout all reps. After completing the set, lower your hips to the floor with control.
| Setup | Lie supine, knees bent, feet flat, band above knees, hips lifted to bridge position |
|---|---|
| Movement | Small 1–2 inch pulses at the top of the bridge; press knees out against band on every pulse |
| Reps/Sets | 15 to 20 pulses; 1 to 3 sets; 60 to 90 seconds rest between sets |
Glute Bridge with Alternating Leg Raise
Glute Bridge with Alternating Leg Raise trains hip extension, lower abdominal control, and anti-rotation stability by removing one leg from the ground while the pelvis stays level. Lie on your back with knees bent, feet flat, and a mini loop band above your knees. Press through both heels to lift into a full bridge position. Once stable at the top, extend your right leg straight out in line with your left thigh, keeping both knees roughly aligned and pressing your left knee outward into the band to prevent hip drop. Hold for one second, then return your right foot to the floor. Immediately extend your left leg, hold, and return. Continue alternating legs for the prescribed number of total reps (one raise per side equals two total reps). Keep your hips level and avoid twisting or dipping the pelvis as each leg lifts.
| Setup | Bridge position, band above knees, hips elevated and stable |
|---|---|
| Movement | Extend one leg straight; pause; return; alternate legs without lowering hips |
| Reps/Sets | 15 to 20 alternating reps (total); 1 to 3 sets; 60 to 90 seconds rest |
Resistance Band Squats
Resistance Band Squats use a band above the knees to create outward tension that activates the hip abductors and prevents knee valgus throughout the squat pattern. Stand with feet slightly wider than hip-width, toes pointed slightly outward, and a mini loop or large loop band positioned just above both knees. Brace your core, hinge at the hips, and bend your knees to lower into a squat. As you descend, actively press your knees outward against the band so they track over the middle of your toes. Lower until your thighs are parallel to the floor or as deep as your mobility allows without your heels lifting or low back rounding. Pause for one second at the bottom, then drive through your heels and midfoot to stand, maintaining outward knee pressure the entire way up.
| Setup | Feet wider than hips, band above knees, core braced, chest up |
|---|---|
| Movement | Squat down while pressing knees out; pause at bottom; drive up through heels |
| Reps/Sets | 12 to 20 slow reps; 1 to 3 sets; 90 seconds rest between sets |
Resistance Band Leg Lifts
Resistance Band Leg Lifts target the hip abductors and tensor fasciae latae by moving the leg directly out to the side against band tension, similar to a standing side leg raise. Stand tall with feet together and a mini loop band around both ankles. Shift your weight onto your left leg, engage your left glute to stabilize your pelvis, and lift your right leg straight out to the side until the band is taut and your foot is six to twelve inches off the floor. Keep your torso upright. Avoid leaning toward the standing leg. Pause at the top, then lower your foot under control without letting the band jerk your leg back. Complete all reps on one side before switching.
| Setup | Stand tall, band around ankles, weight on one leg, hold chair or wall if needed |
|---|---|
| Movement | Lift opposite leg out to the side 6–12 inches; pause; lower slowly |
| Reps/Sets | 10 to 15 reps per side; 1 to 3 sets; 60 seconds rest between sets |
Dynamic Movement Patterns: Band Walks and Kickbacks
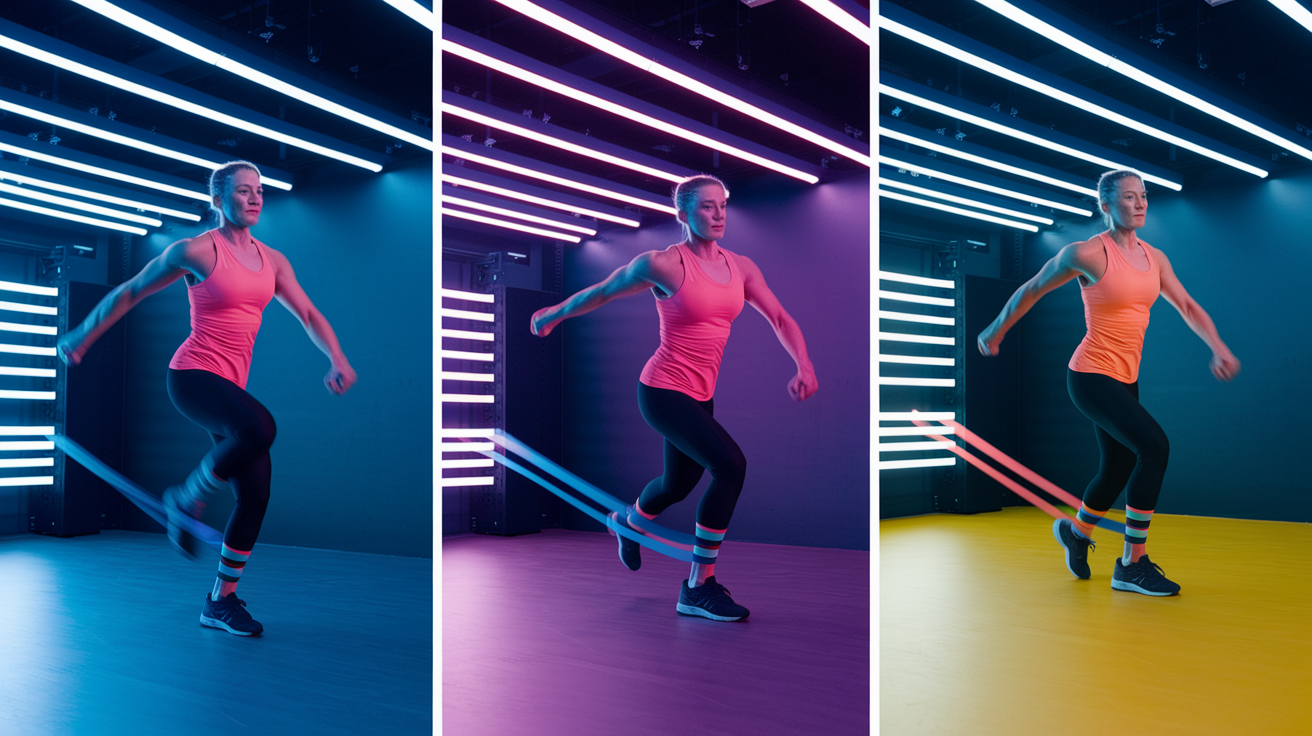
Dynamic movement patterns train coordination, balance, and strength across multiple planes of motion by combining locomotion with resistance. Unlike static holds or isolated pulses, walks and kickbacks require you to maintain tension while moving through space, which builds neuromuscular control, improves gait mechanics, and prepares the body for real-world activities like running, hiking, and change-of-direction sports. These drills are often programmed at the end of a warm-up to elevate heart rate and activate stabilizers or inserted into circuits as metabolic conditioning finishers.
Band walks and kickbacks also expose asymmetries. If one hip collapses inward during a lateral walk or one knee caves during a diagonal step, you have immediate feedback to correct the pattern. Over time, these drills teach your nervous system to maintain proper joint alignment under fatigue, which carries over into heavier squats, deadlifts, and explosive movements.
1. Standing Glute Kickbacks
Standing Glute Kickbacks train single-leg hip extension, posterior chain strength, and balance. Stand tall with a mini loop band around both ankles, feet together, and hands on a wall or chair for light support. Shift your weight onto your left leg, brace your core, and extend your right leg straight back, pressing into the band until it’s taut. Keep your right leg straight or allow a slight knee bend, but avoid arching your low back or tilting your pelvis forward. Pause for one second at full extension, squeeze your right glute hard, then return your foot to the starting position under control. Complete all reps on one side before switching. You should feel this in the glutes and hamstrings of the kicking leg and the glute of the standing leg as it stabilizes.
2. Lateral Band Walk
Lateral Band Walk strengthens the gluteus medius, improves frontal-plane stability, and teaches proper knee tracking during side-to-side movement. Place a mini loop band around your ankles or just above your knees (above-knee placement is easier and better for beginners). Stand with feet shoulder-width apart, knees slightly bent, and core engaged. Step your right foot directly to the right, maintaining tension in the band, then follow with your left foot so your feet return to shoulder-width. Take ten small, controlled steps to the right, then reverse direction and take ten steps to the left. Move slowly and deliberately. Rushing reduces neuromuscular benefit. Keep your knees pressed outward and avoid letting them collapse inward or allowing your torso to lean side to side.
3. Diagonal Band Walk
Diagonal Band Walk combines forward movement with lateral hip abduction, training the gluteus maximus, gluteus medius, and gluteus minimus in a pattern that mimics hiking uphill or climbing stairs at an angle. Place a mini loop band around your ankles. Stand tall with feet hip-width apart. Step your right foot forward and diagonally to the right (roughly 45 degrees), then bring your left foot forward and diagonally to catch up. Take several wide diagonal steps forward, keeping the band taut the entire time. Once you’ve moved forward five to ten steps, reverse the pattern by stepping backward on the same diagonal angle until you return to your starting position. Switch lead legs and repeat. You should feel continuous tension in the glutes and outer thighs throughout the walk.
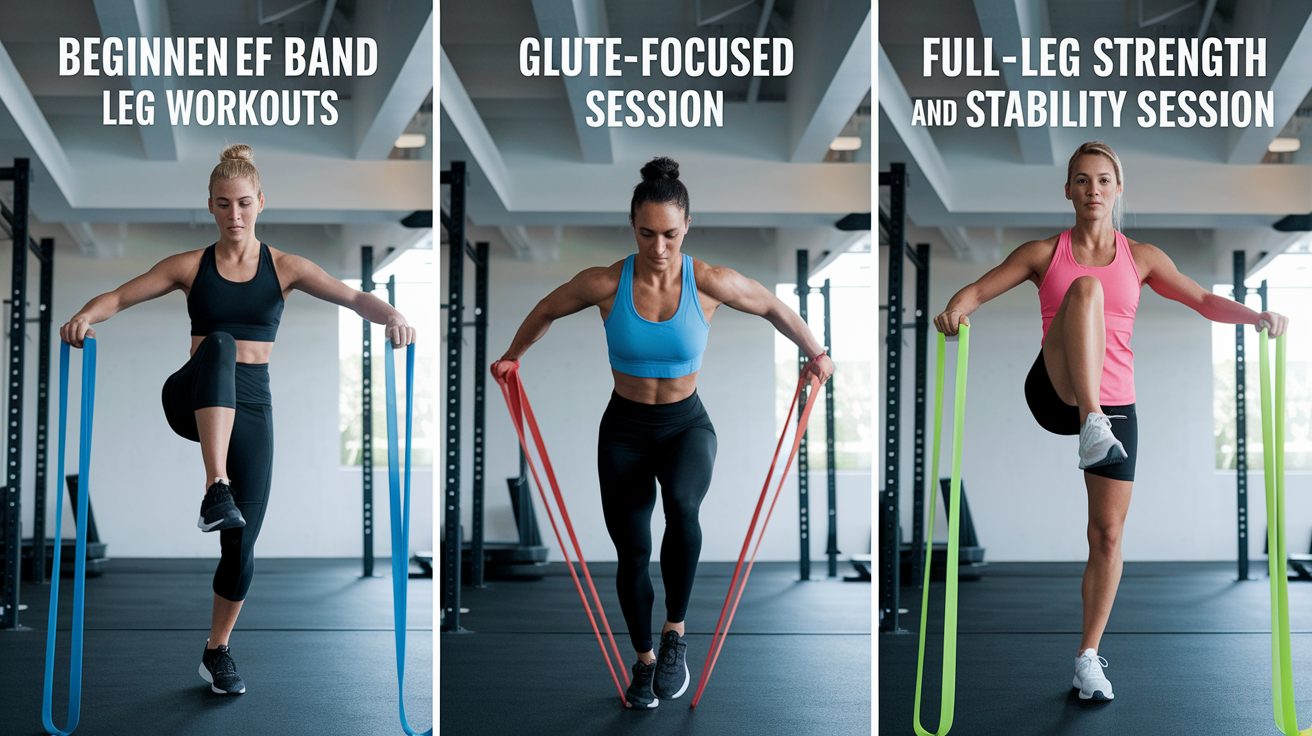
Sample Resistance Band Leg Workouts (Beginner, Glutes, Full-Leg)
Structured sample workouts give you a plug-and-play template for different goals, experience levels, and time constraints. Each routine below includes specific exercises, sets, reps, rest intervals, and coaching notes. You can perform any of these workouts two to three times per week, allowing at least one rest day between sessions for the same muscle groups. As you progress, increase band resistance, add sets, or incorporate tempo variations to continue building strength.
Beginner Full-Leg Session
This circuit is designed for someone new to resistance training or returning after a break. It covers all major movement patterns with moderate volume and built-in rest. Use one medium mini loop band and one medium large loop band. Complete three rounds of the entire circuit, resting sixty to ninety seconds between rounds.
• Resistance Band Squats (band above knees): 10 to 12 reps
• Lateral Band Walk (band around ankles): 10 steps each direction
• Clamshells (band above knees): 10 reps per side
• Glute Bridge Pulses (band above knees): 15 reps
• Standing Glute Kickbacks (band around ankles): 8 reps per side
Glute-Focused Session
This workout emphasizes hip extension, abduction, and external rotation with higher volume to build glute strength and size. Use a medium to heavy mini loop band. Rest ninety seconds between exercises, not between sets. Perform all sets of one exercise before moving to the next.
• Glute Bridge Pulses (band above knees): 4 sets of 15 to 20 reps
• Fire Hydrants (band above knees): 4 sets of 12 to 20 reps per side
• Standing Glute Kickbacks (band around ankles): 3 sets of 12 to 15 reps per side
• Diagonal Band Walk (band around ankles): 3 sets of 10 forward steps and 10 reverse steps
• Clamshells (band above knees): 3 sets of 15 reps per side
Full-Leg Strength and Stability Session
This session balances bilateral strength exercises with unilateral stability drills and dynamic movement patterns. Use one medium and one heavy loop band. Rest two minutes between exercises to allow full recovery and maintain quality reps.
• Resistance Band Squats (heavy band above knees): 3 sets of 12 to 15 reps
• Glute Bridge with Alternating Leg Raise (medium band above knees): 3 sets of 16 to 20 alternating reps
• Tabletop Glute Kickbacks (medium band around arches): 3 sets of 12 reps per side
• Resistance Band Leg Lifts (medium band around ankles): 3 sets of 10 reps per side
• Lateral Band Walk (medium band around ankles): 2 sets of 20 total steps (10 each direction)
Safety, Form Tips, and Common Mistakes in Resistance Band Leg Exercises
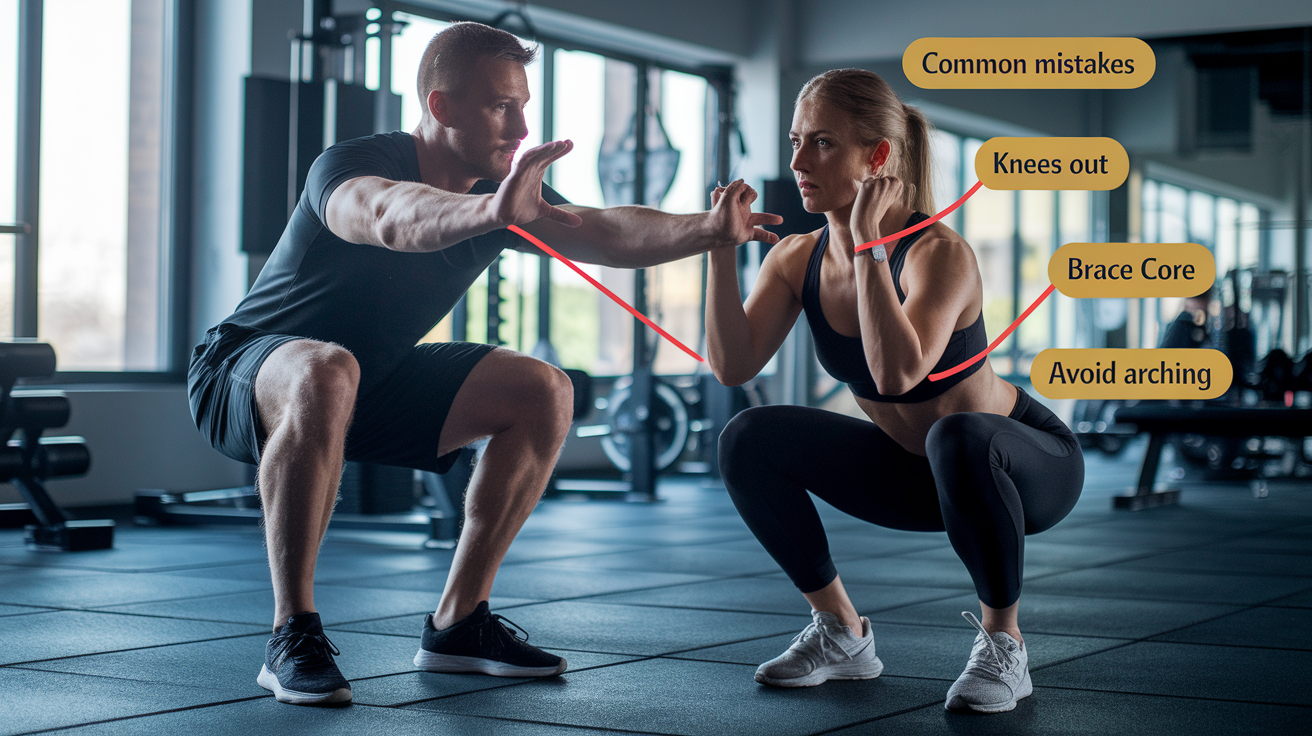
Proper form protects joints, maximizes muscle engagement, and ensures progressive overload translates into strength gains rather than compensatory patterns or injury. Resistance bands provide continuous feedback through tension, but that same tension can reinforce poor movement if you allow the band to dictate your alignment. Most mistakes stem from losing core stability, allowing the band to pull joints out of position, or rushing through reps to finish the set rather than controlling the eccentric and concentric phases.
Before starting any banded leg session, spend two minutes performing bodyweight versions of the movements you plan to load. A few slow bodyweight squats, bridges, and leg lifts remind your nervous system of the correct pattern and help you identify any asymmetries or range-of-motion restrictions. If a movement feels painful (sharp, shooting, or joint-based pain, not muscular fatigue), stop and reassess your setup, band placement, or exercise selection.
Six common mistakes and how to fix them:
• Knees caving inward during squats or bridges: This happens when the hip abductors are weak or fatigued and the band overpowers them. Fix: use a lighter band, reduce reps, or place one hand on the outside of each knee as a tactile cue to press outward.
• Arching the low back during bridges or kickbacks: Overextending the lumbar spine shifts load away from the glutes and onto the erector spinae. Fix: brace your core before each rep, tuck your pelvis slightly, and stop the movement before your ribs flare or low back arches.
• Shifting hips or torso during fire hydrants and tabletop kickbacks: Compensation through the torso reduces glute activation and increases low-back strain. Fix: move slower, reduce range of motion, and imagine balancing an object on your lower back to maintain a stable position.
• Letting the band go slack during band walks: Slack bands eliminate tension and turn the drill into a mobility exercise instead of a strength exercise. Fix: maintain a quarter-squat stance, keep feet wide enough to keep the band taut, and step with control.
• Leaning the torso during standing leg lifts or kickbacks: Leaning shifts the center of mass and recruits the obliques and quadratus lumborum instead of isolating the hip muscles. Fix: stand tall, engage your core, and keep your shoulders stacked over your hips. Use a wall or chair for light fingertip support if needed.
• Rushing through reps to reach the target count: Fast, jerky reps reduce time under tension and increase injury risk. Fix: use a two-second concentric, one-second pause, and three-second eccentric tempo. If you can’t maintain that tempo, reduce the band resistance or the number of reps.
Tracking Progress and Measuring Strength Gains With Resistance Bands
Tracking progress with resistance bands requires different metrics than barbell training because you can’t simply add weight to a bar. Instead, you track reps completed, band resistance level, tempo, range of motion, and stability improvements. Every two weeks, reassess one or more of these variables to confirm you’re applying progressive overload. Write down the band color or thickness, the number of sets and reps completed, and any notes about form quality or fatigue. Over time, patterns emerge. If you started with a yellow mini loop and twelve reps of banded squats felt hard, but now you complete twenty reps with the same band and still have energy left, it’s time to switch to a red or green band and reset reps to twelve.
Stability improvements are harder to quantify but just as valuable. Can you perform a single-leg glute bridge without your hips shifting side to side? Can you complete ten diagonal band walks without your torso leaning or your knees caving? These qualitative markers indicate better motor control and joint stability, which reduce injury risk and improve performance in sports and daily activities. Take a short video of your form every four weeks and compare it to earlier footage. You’ll often notice smoother movement, better alignment, and less compensatory shifting even if the weight on the scale or the band resistance hasn’t changed dramatically.
Final Words
You got a compact roadmap: quick examples (Fire Hydrants, Band Squats, Glute Bridges, Lateral Walks, Kickbacks), why bands work, how to pick the right bands, progressions, sample workouts, and safety tips.
Use the simple steps: pick a band, start with activation moves, add strength patterns, then mix in dynamic walks and a short routine.
Track reps, tension, and form. Small, steady steps add up — try the sample sessions, log progress, and enjoy the gains from resistance band leg exercises.
FAQ
Q: Are resistance bands effective for legs?
A: Resistance bands are effective for legs because they provide constant tension, target quads, hamstrings, and glutes, and let you build strength and endurance safely without heavy weights.
Q: Can resistance bands help rotator cuffs?
A: Resistance bands can help rotator cuffs by allowing controlled internal and external rotation and scapular work with light, precise resistance—use them for rehab with a clinician’s guidance.
Q: Can resistance bands help with osteoporosis?
A: Resistance bands can help with osteoporosis by providing progressive muscle-loading that safely stresses bone, improving strength and balance—get medical clearance and follow a structured plan.
Q: How to use resistance bands for legs for seniors?
A: Using resistance bands for legs for seniors means picking light bands, starting with supported or seated moves, using slow reps, prioritizing balance, and progressing gradually with professional input.